
Stop chasing updates and start resolving tickets with Jira Automation

One of the most labor intensive tasks is making sure your fellow employee’s requests are resolved. After 48 hours the likely hood of a follow up response sharply drops off. You have probably done this yourself after you’ve reached out to a company requesting customer support. Once your issue is resolved you just ignore those follow up emails asking if the issue is resolved. Sometimes you’re just busy, other times your email provider thinks they’re spam. Regardless, whether you’ve submitted a request and forgot to follow up, or you’re working on a request and not getting any response, it’s a really shitty experience.
Why should you automate it?
First let’s understand the problem…
As your ticket company (and end-users) scale, the ticket volume does as well. There is usually a sequential order to how the problem presents itself:
Tickets are submitted to the IT Help Desk.
The IT Support team provides solutions and updates the tickets, setting them to “Pending” while asking for an update if the issue is resolved.
Without any automation, tickets continue to stay in the Pending status, and the Pending queue slowly expands.
The IT Support team continues to work on incoming tickets, responding and setting them to Pending, until the Pending Queue has grown quite large and the team does a massive “Purge” to close everything.
So why is this bad?
Leaving tickets pending will lead to false data in roll up reports.
The amount of time a ticket was “open” is categorically false, and your reports will show tickets that took months to close, that were realistically solved in just days or hours.
If you leverage other Ticket Status based automations, they will fail.
It promotes the “Not my problem” ideology and lack of ownership.
It can set a precedent with the team that tickets are done when set to pending.
“Someone else will close my ticket when we purge the queue.”
“Purging” the queue is not a scalable solution.
How to automate update requests and resolutions
Automating the process can be done in a lot of different ways, but however you approach it you’ll likely want to include to make sure you automate the “prompt for response” and setting the Resolution. Below I will explain a custom solution built using Jira Service Management and Jira Automation. This solution assumes that you have a current Jira Service Management project that includes the default workflows and request types, and preconfigured statuses like Pending, Waiting for Support, or In Progress. That’s it!* We’ll build everything else using custom fields, automations, and JQL Search Patterns.
*You’ll also need to be an Atlassian or Jira Admin to make these changes.
Build the Custom Fields
First off, we’ll head over to Jira’s Issue settings page. For Jira cloud it should be something like: https://${my-subdomain}.atlassian.net/jira/settings/issues/issue-types
Click the Custom Fields section in the left-hand sidebar.
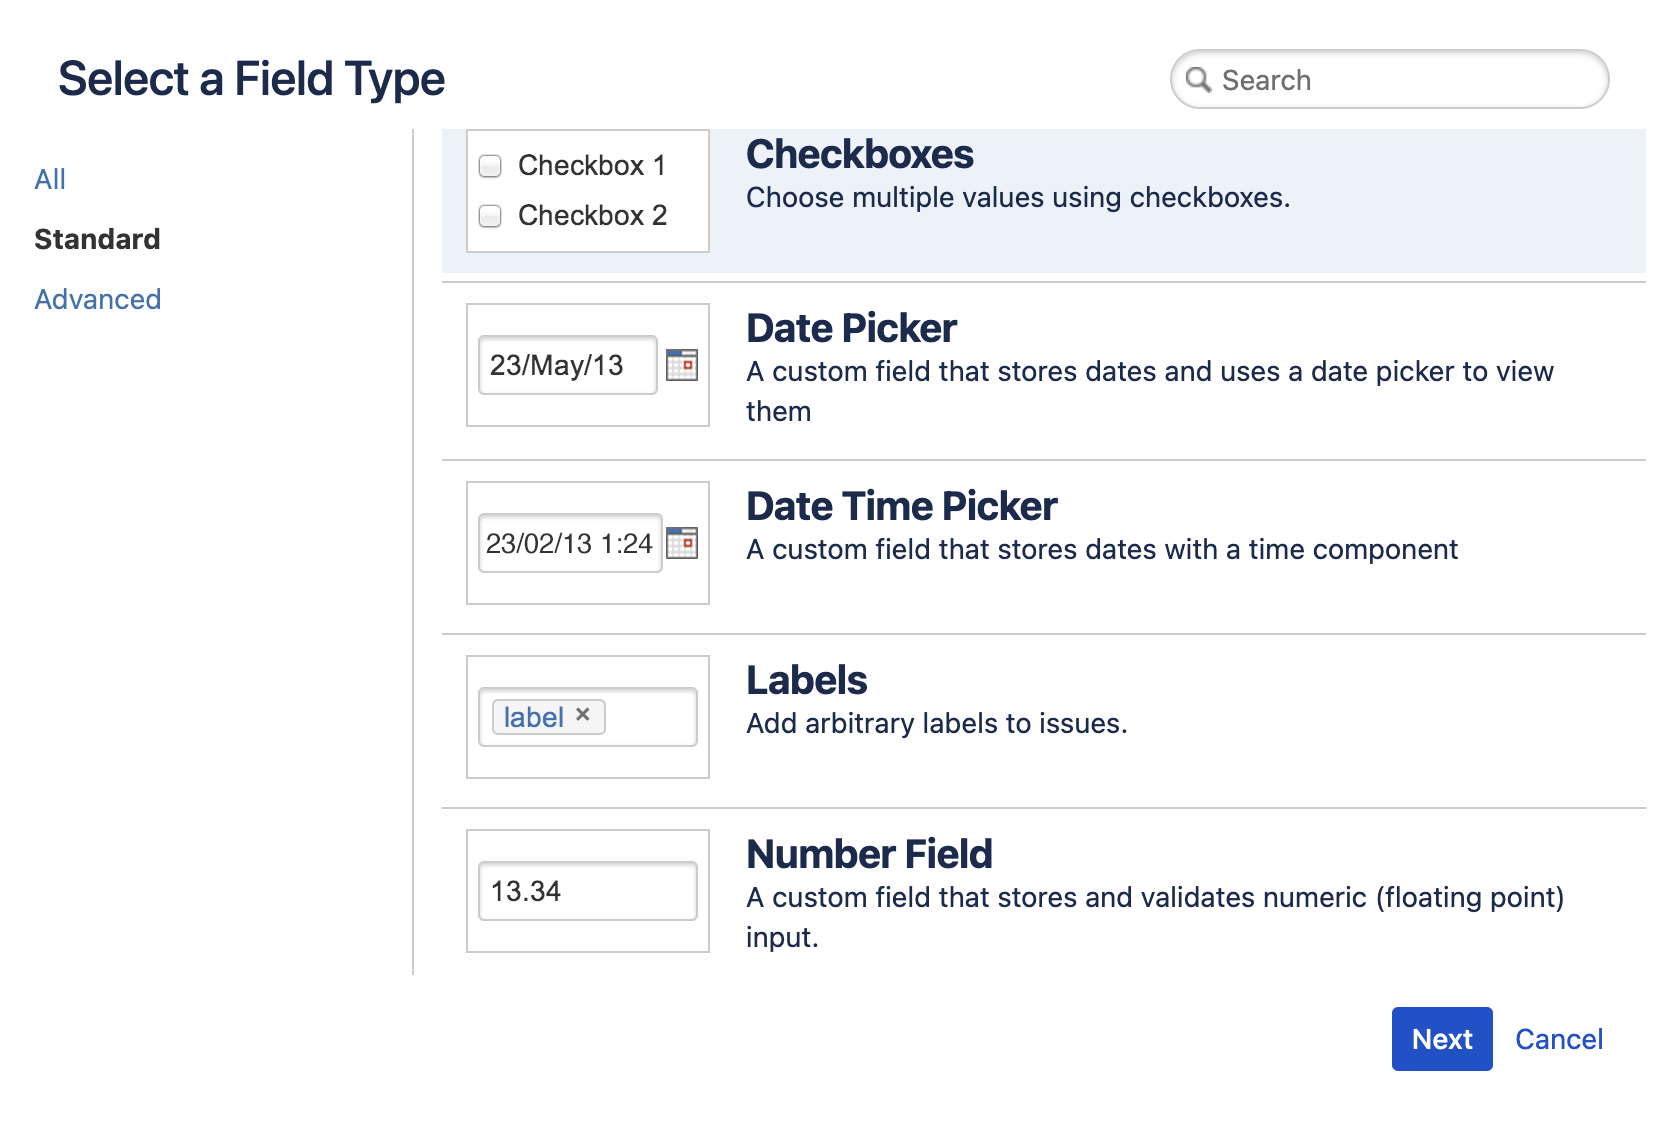
Click Create Custom Field.
Use Checkboxes as the custom field type.
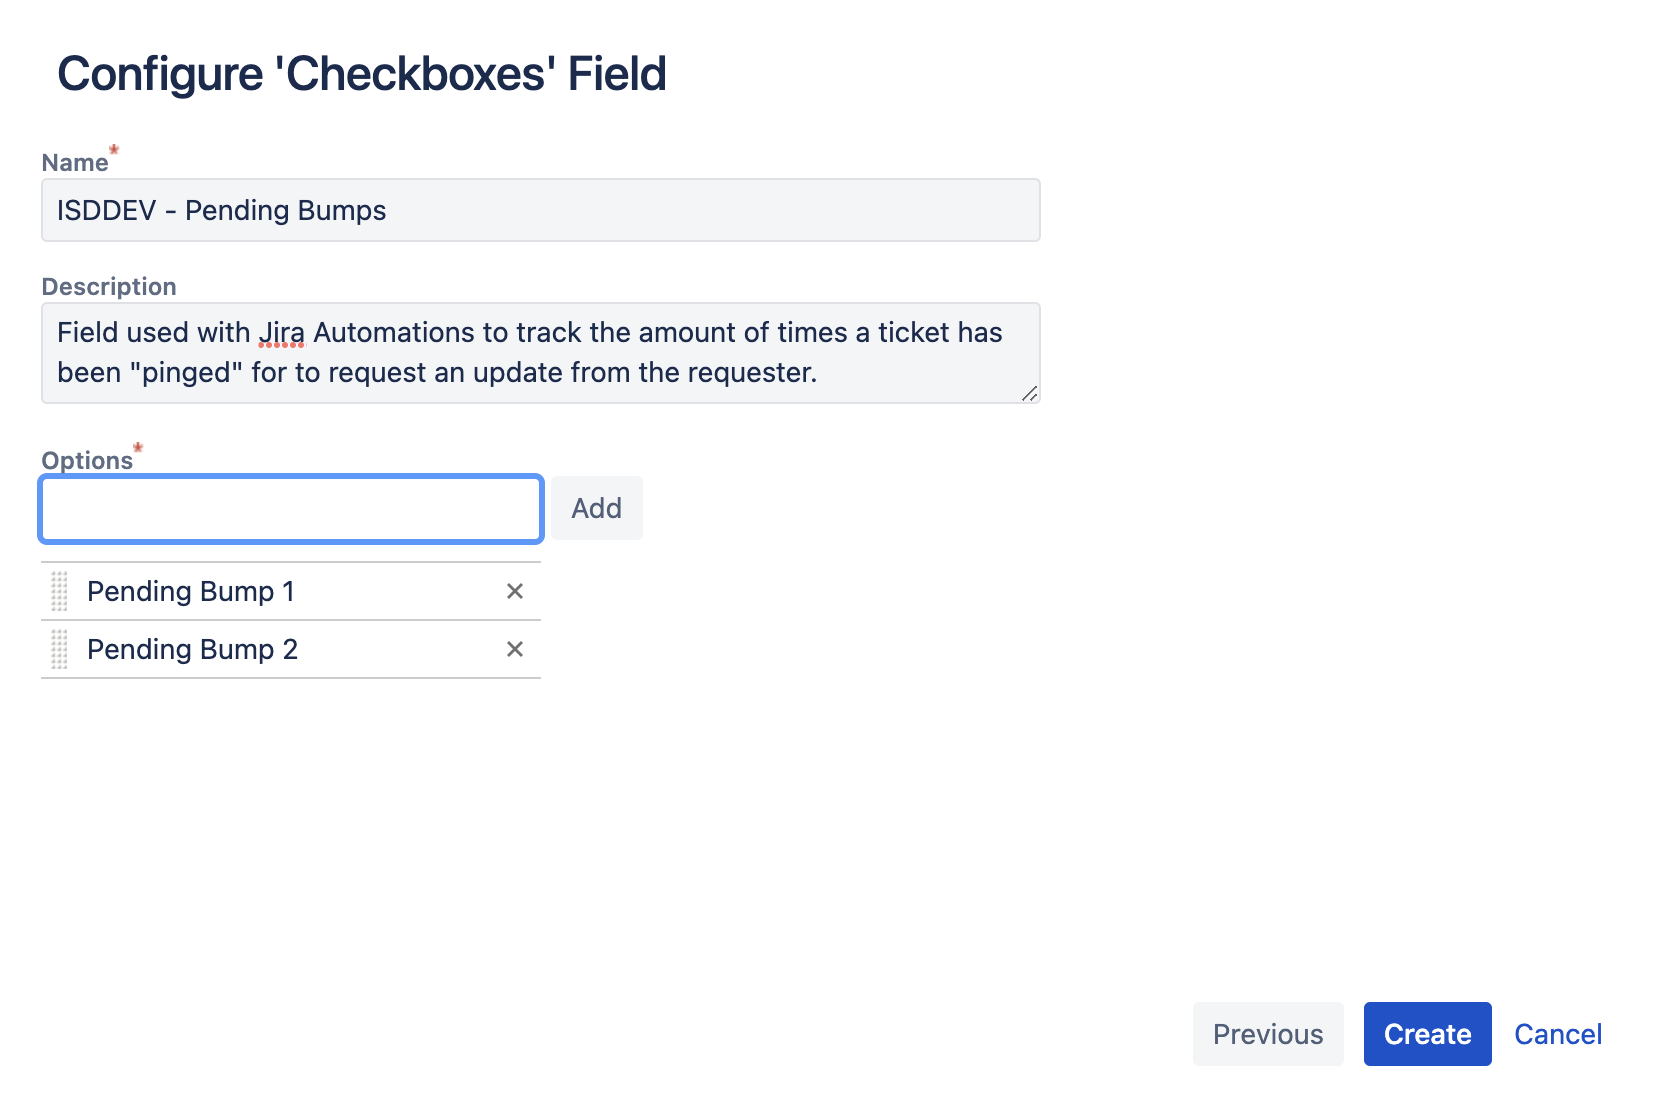
Give your custom field a name and a description for how it will be used.
I like to make sure i reference the project it’s used for in the title and including in the description that it will mainly be used for Automation and not customer facing/accessible.
Input the Options for the checkboxes. This can vary based on your needs, but I usually like to give 2 follow up pings before we close out the ticket using the automation.
For this section we are using “Pending Bump 1” and “Pending Bump 2” as the checkbox options.
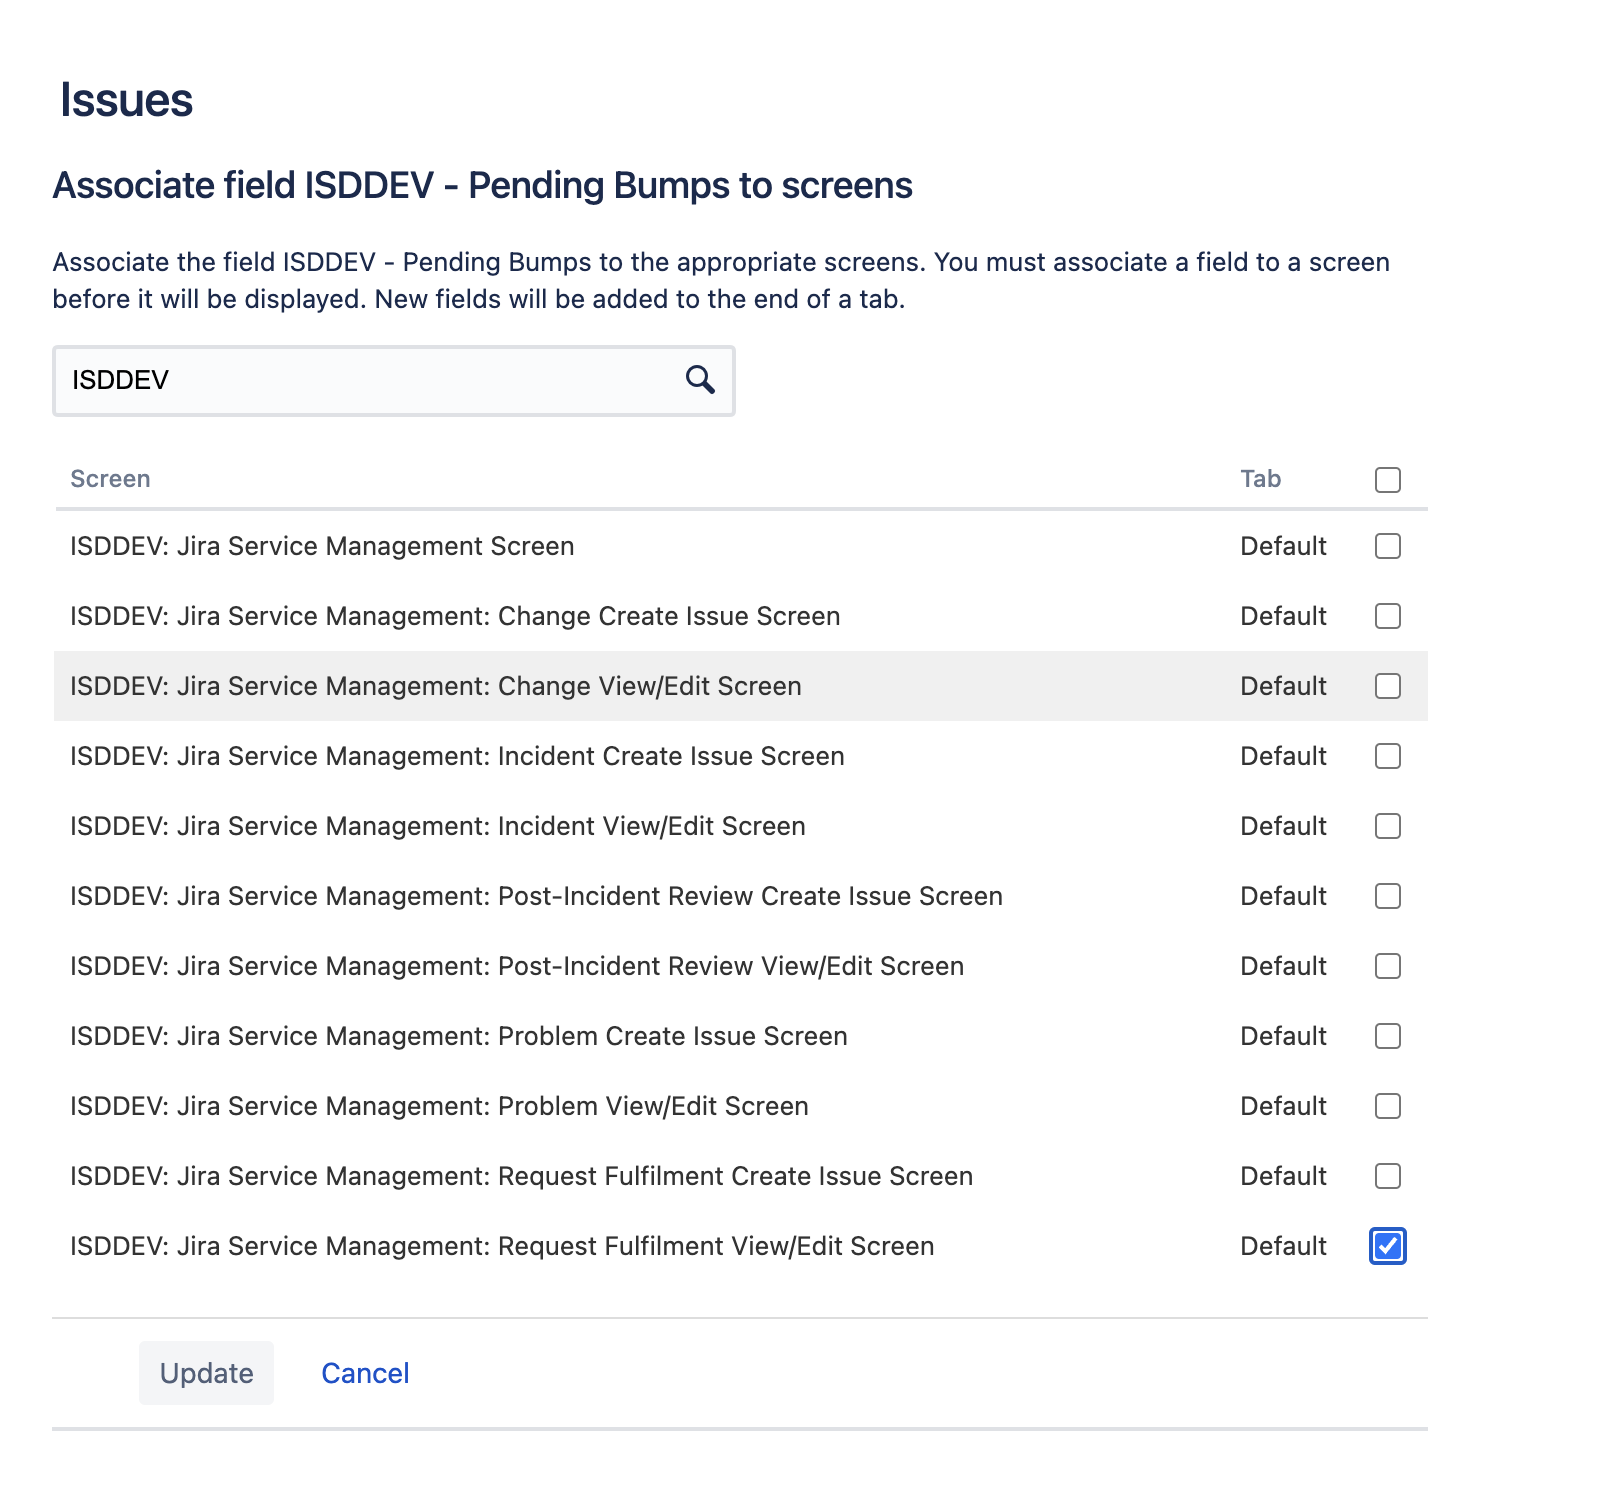
Select the Screens that this field will be available on.
Since this is only going to be used for Requests from Customers or End-Users I’ve only included the Request Fulfillment - View/Edit Screen as this will correlate to the Service Requests issue/request types in Jira.
Click Update and now you’ll have a custom field!
Making the Custom Field Visible in your Jira Service Management Project
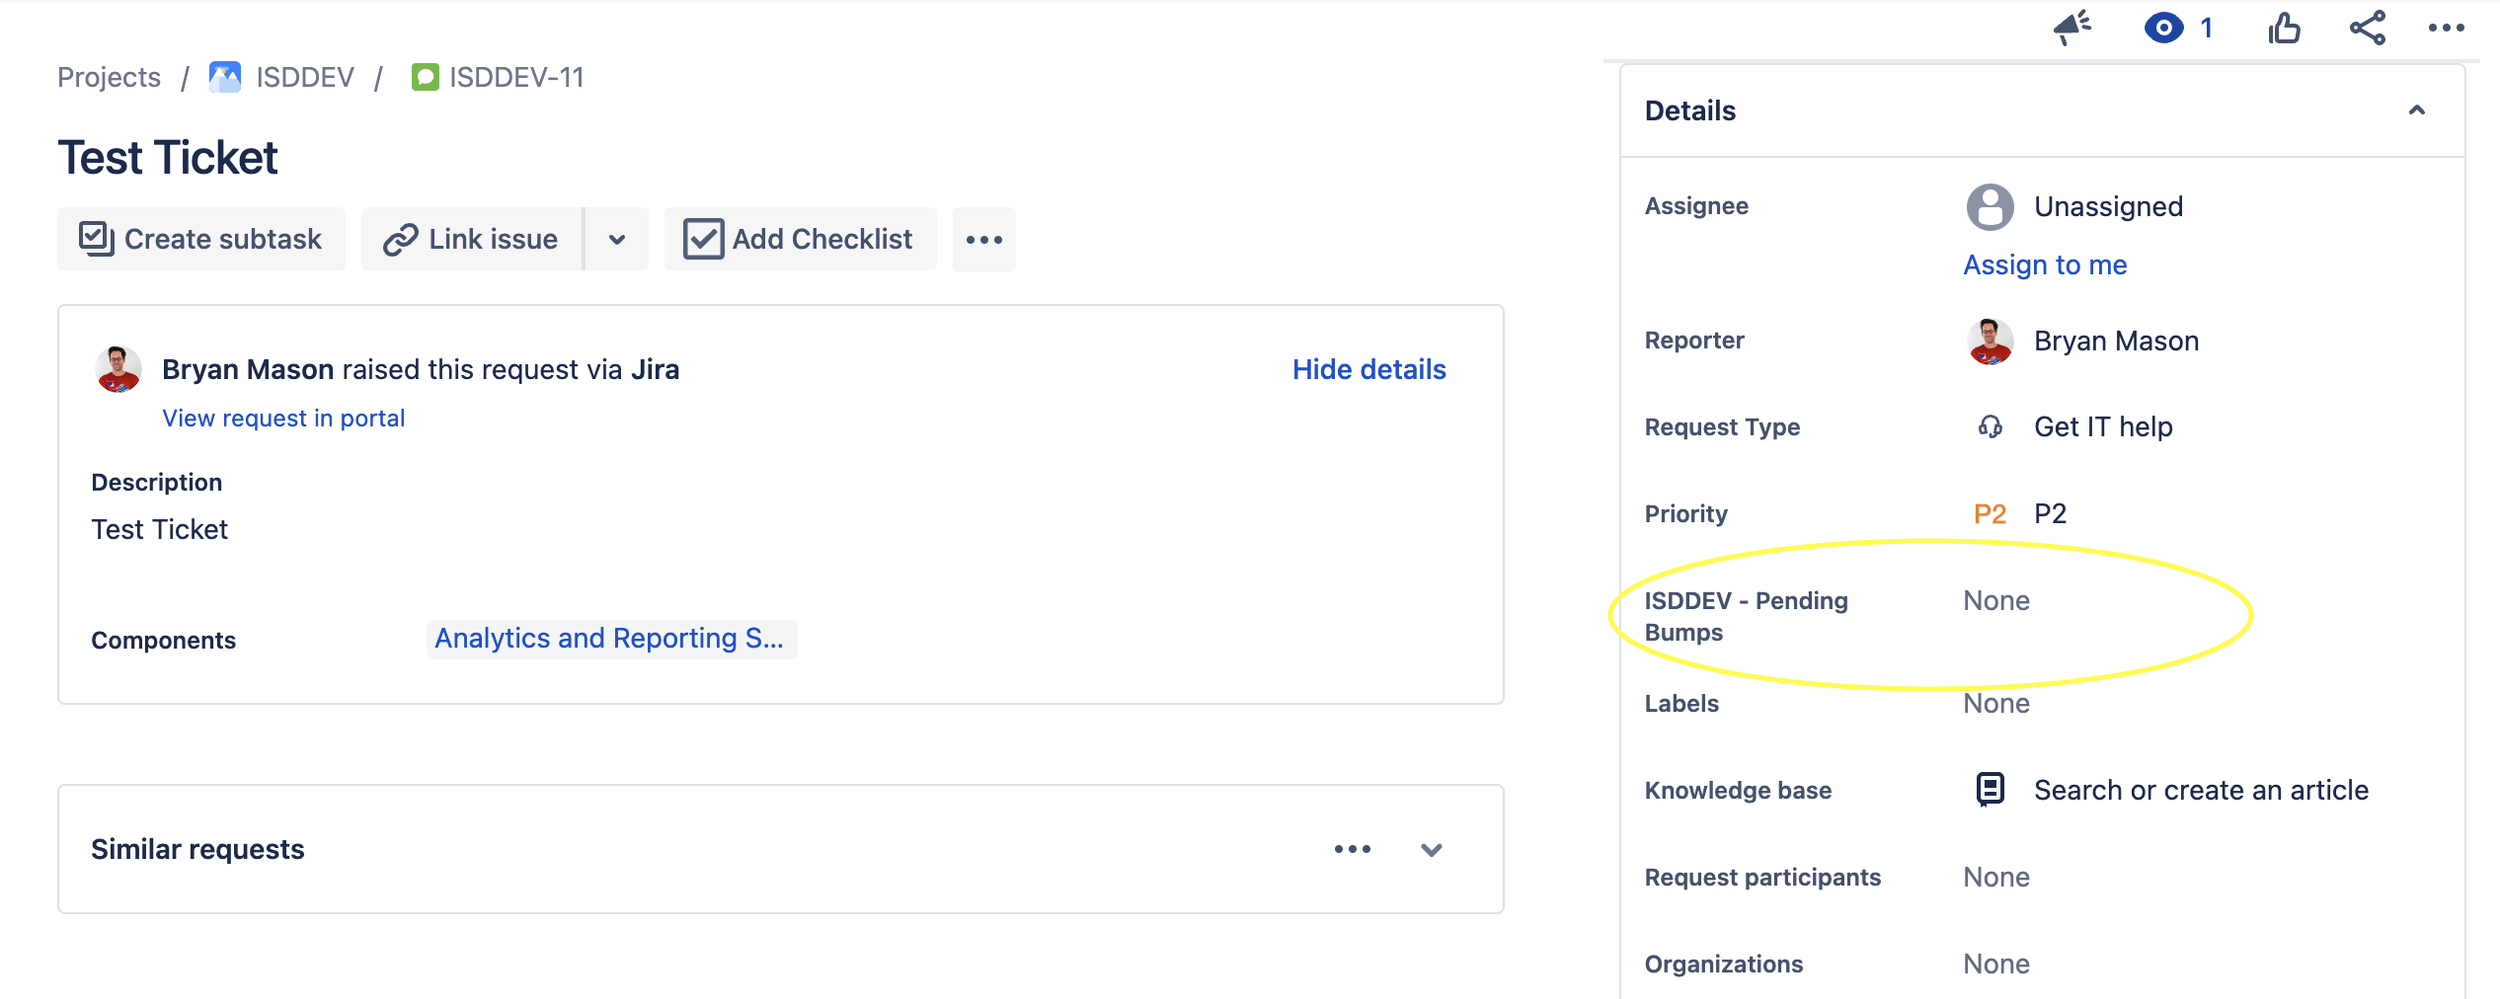
Now that you’ve built the custom field and associated it with the project, it’s time to make it visible before you start building the automation:
Navigate to your Project In Jira and Click on Project Settings.
Click on Request Types and select the Request Type to edit.
Click Issue View and Find the Custom Field you created.
Drag it to the Context Fields section and click Save.
Repeat Step 2 for all of the Request Types you want to enact the Pending Bump automation on.

Building the Automation
Now that we’ve built the custom fields and assigned them to our Request Types we’ll build an automation to comment on the tickets and update our Pending bump checklist:
- Navigate to your Project In Jira and Click on Project Settings > Automations.
- Click Create Rule.
- This rule is going to run on a schedule so the trigger should be Scheduled and change it to Advanced (Cron expression).
- I like to make sure this Automation only runs on weekdays and in the mornings. Since Jira Automation uses UTC you’ll need to convert your time to UTC to make sure it’s not running when you want.
- Cron Frequencey:
0 15 17 ? * MON-FRI
- Cron Frequencey:
- Select Run a JQL search and execute actions for each issue in the query. We'll specifically look for issues that are in the "Pending" state and haven't been updated in the last 3 days.
- Your JQL can use OR Operators if you have multiple request types you want the automation to affect, just wrap them in ( ) to make sure there is no error.
- JQL:
project = "ISDDEV" AND ("Request Type" = "Get IT help (ISDDEV)" OR "Request Type" = "Systems Access (ISDDEV)") AND status = Pending AND updated <= -3d
- I like to make sure this Automation only runs on weekdays and in the mornings. Since Jira Automation uses UTC you’ll need to convert your time to UTC to make sure it’s not running when you want.
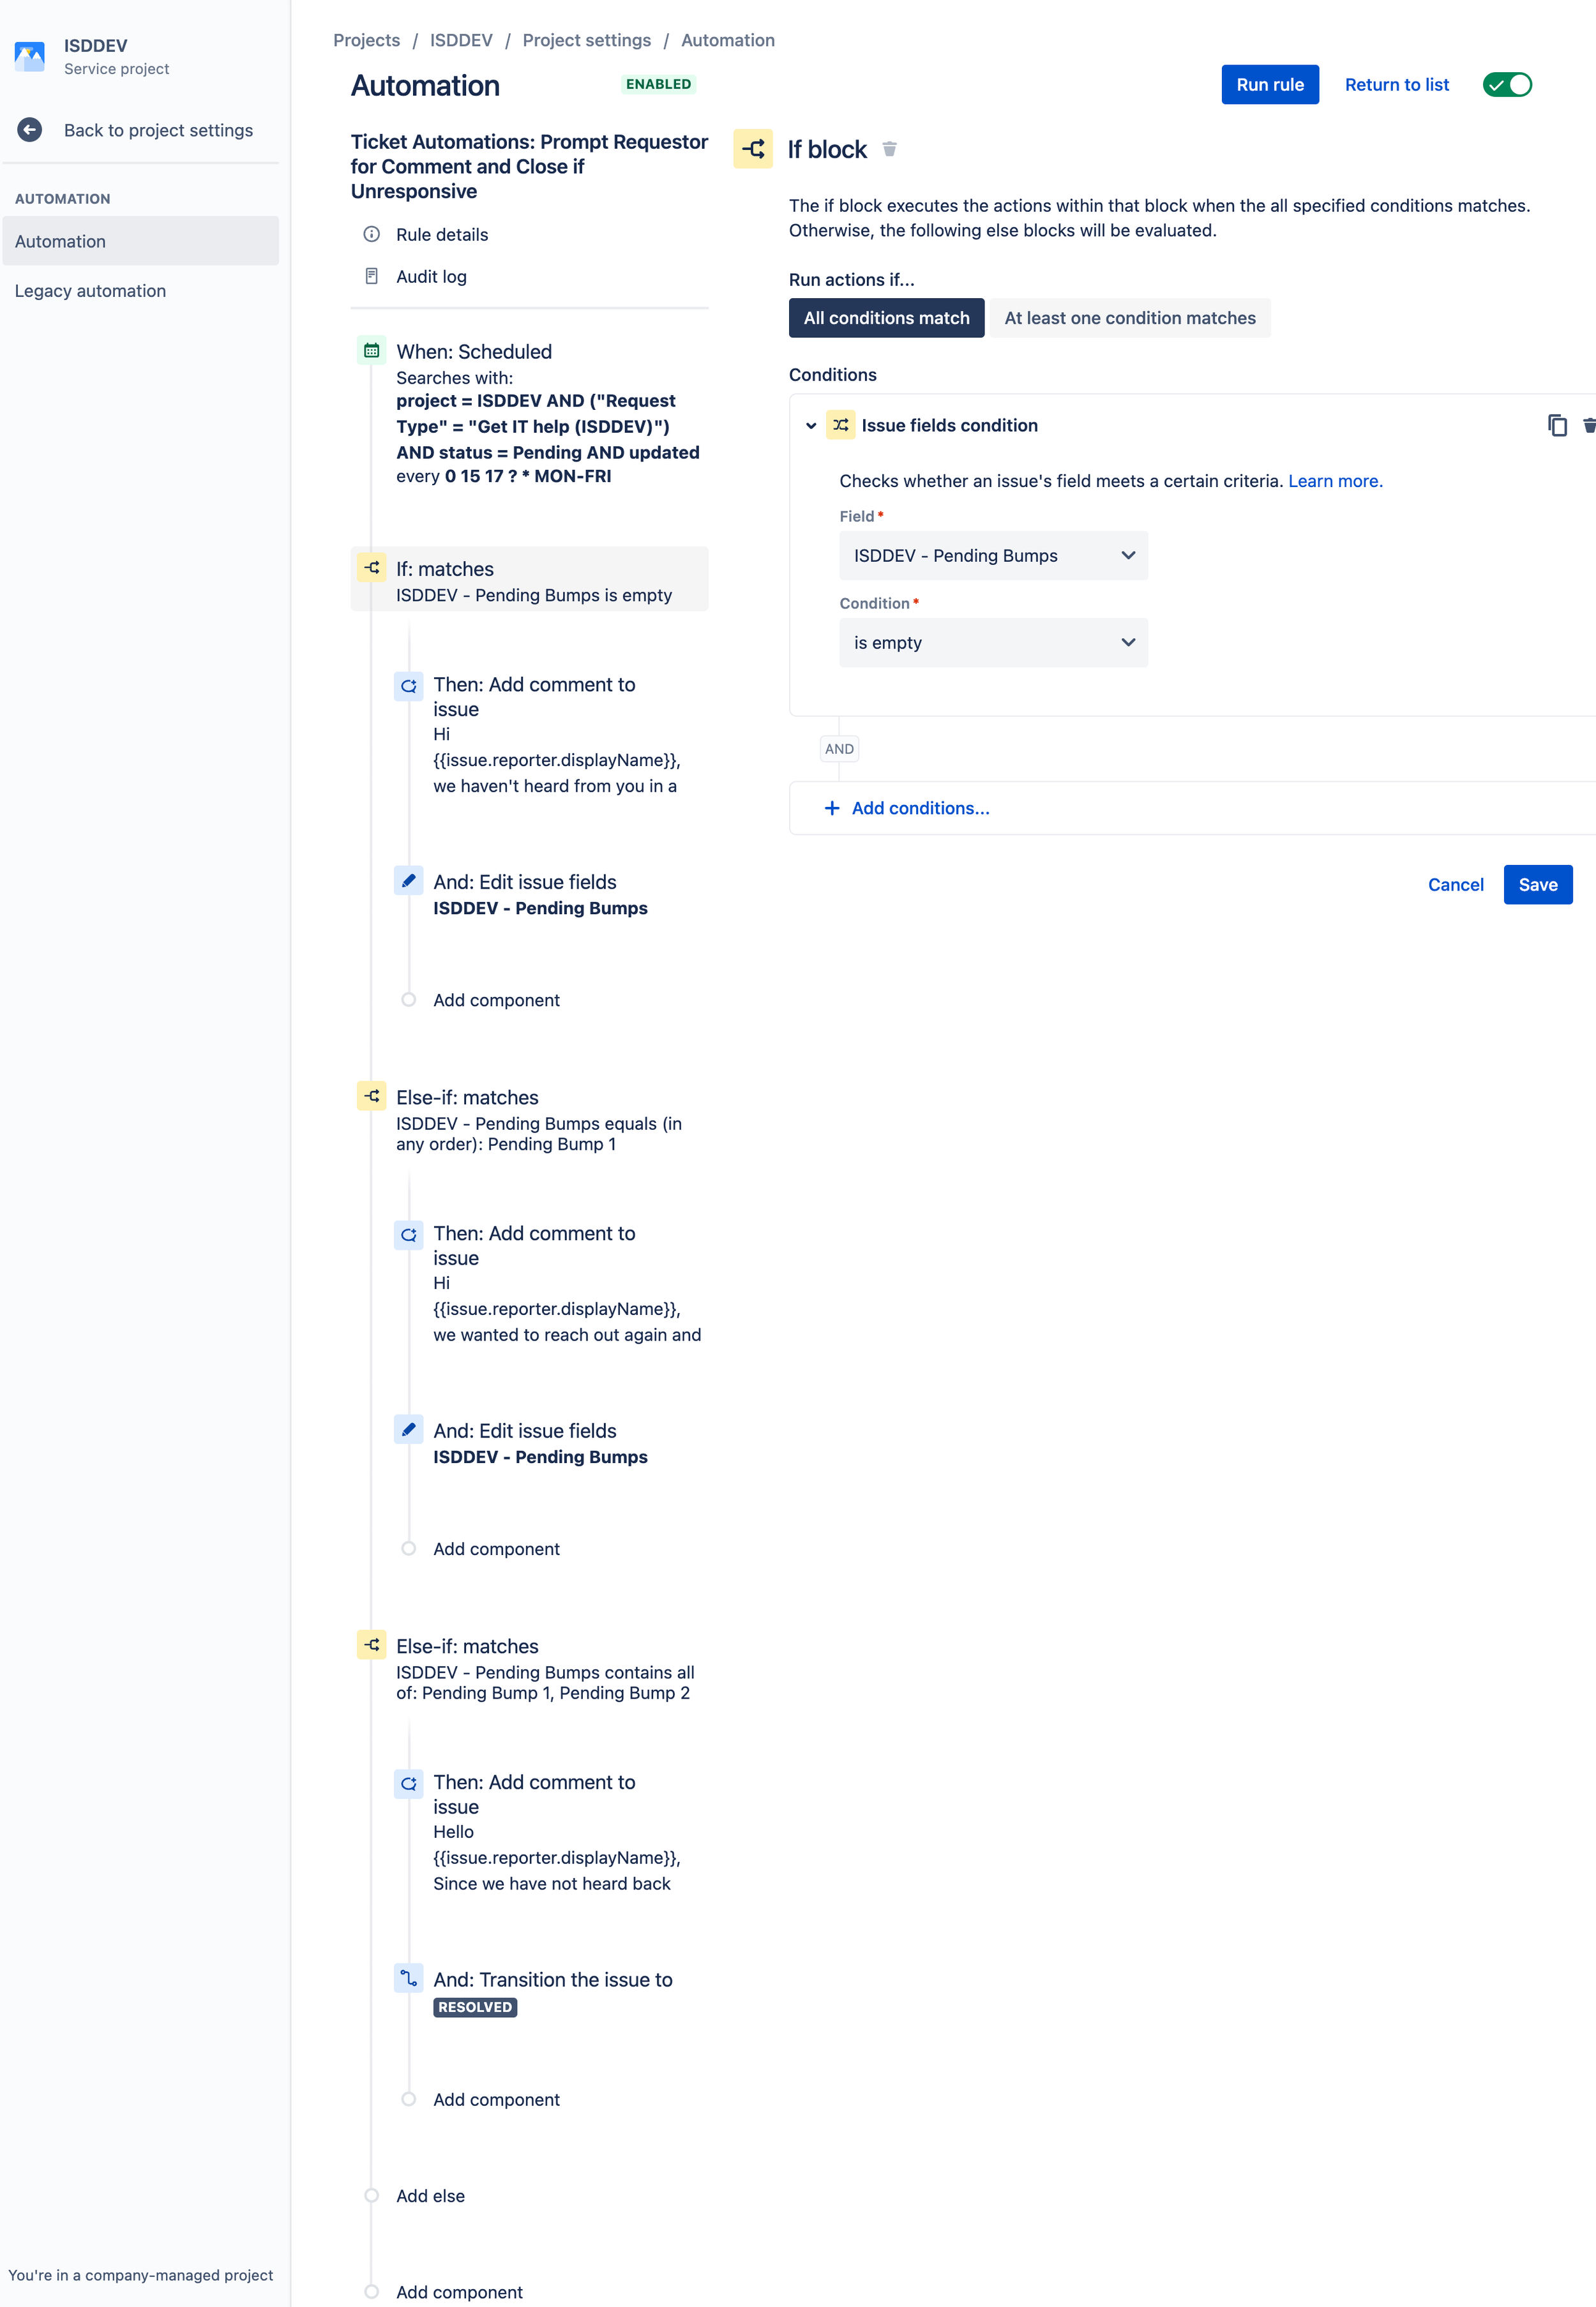
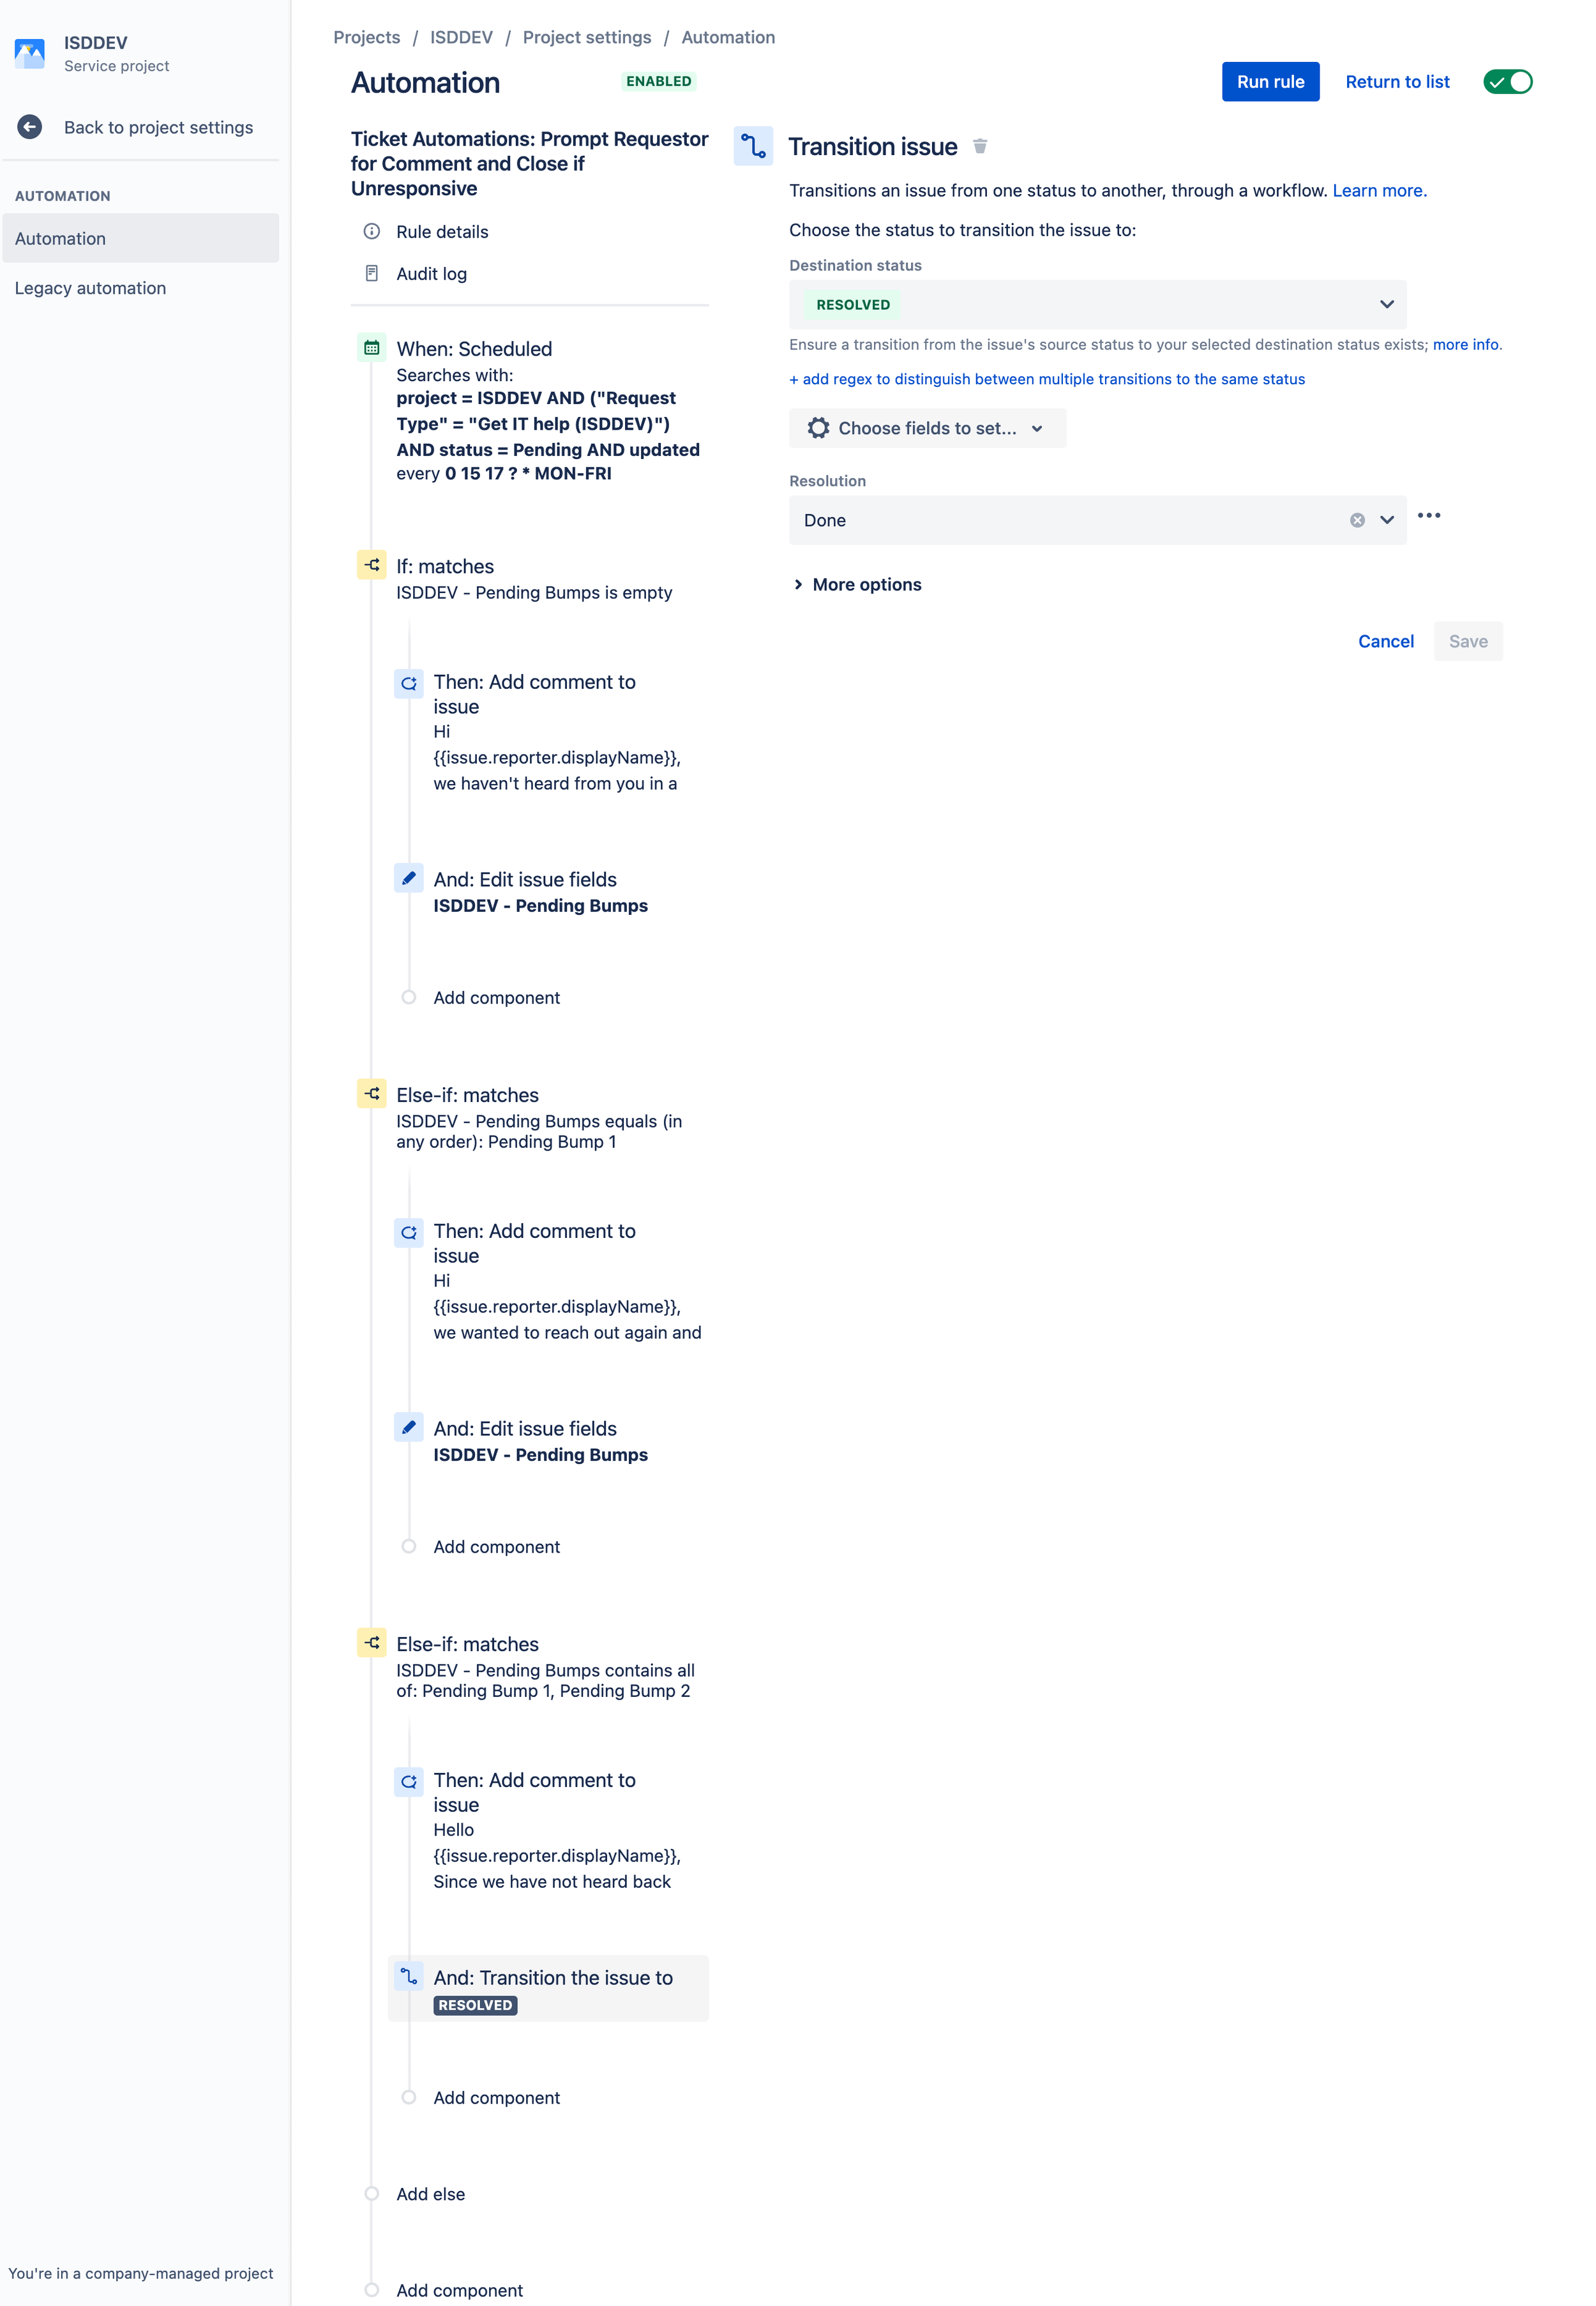
- Create and If/Else Condition Block
- Set the first block to check for the Issue Fields Condition and set the condition to Is Empty
- Add an New Action Component to Comment on the ticket
- Enter your comment and make sure it is publicly visible.
- You can also use Jira Smart values to automatically use the display name and agent name in the comment to make it more personalized.
{{issue.reporter.displayName}}and{{issue.assignee.displayName}}are used in my example comments.
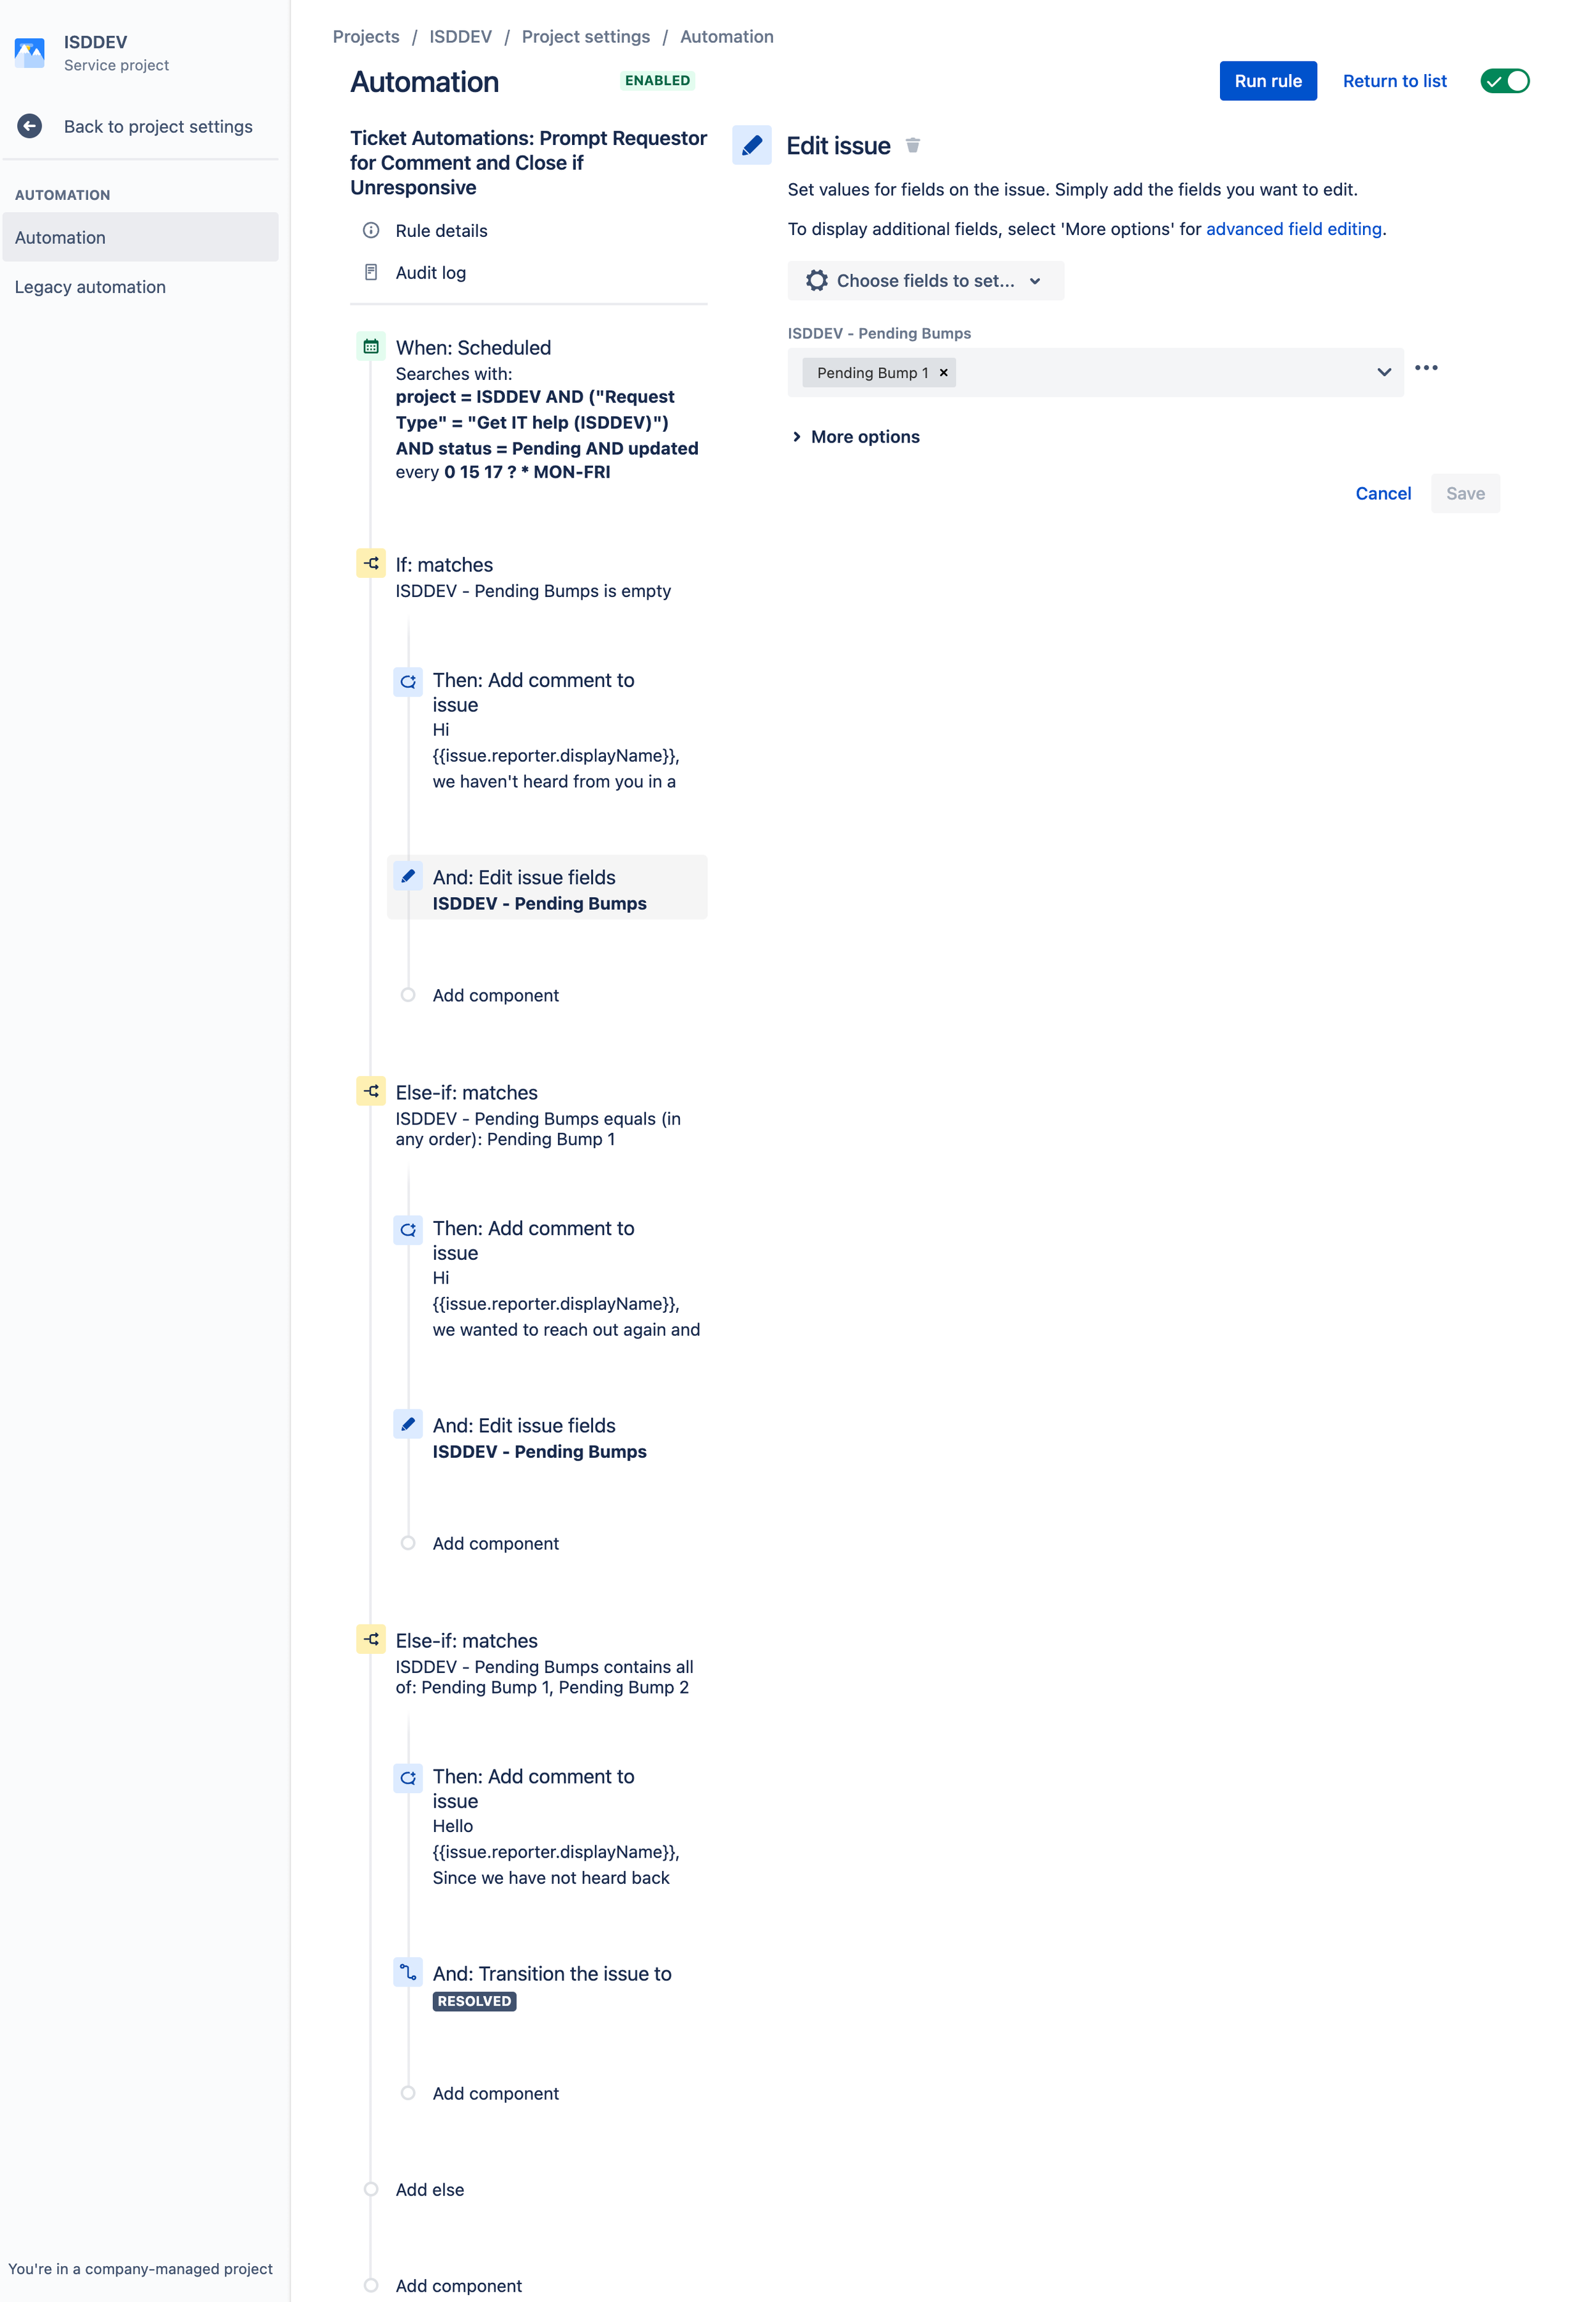
- Add a second New Action Component - Edit Issue
- Choose your Custom Pending Bump Field and Set it to “Pending Bump 1”
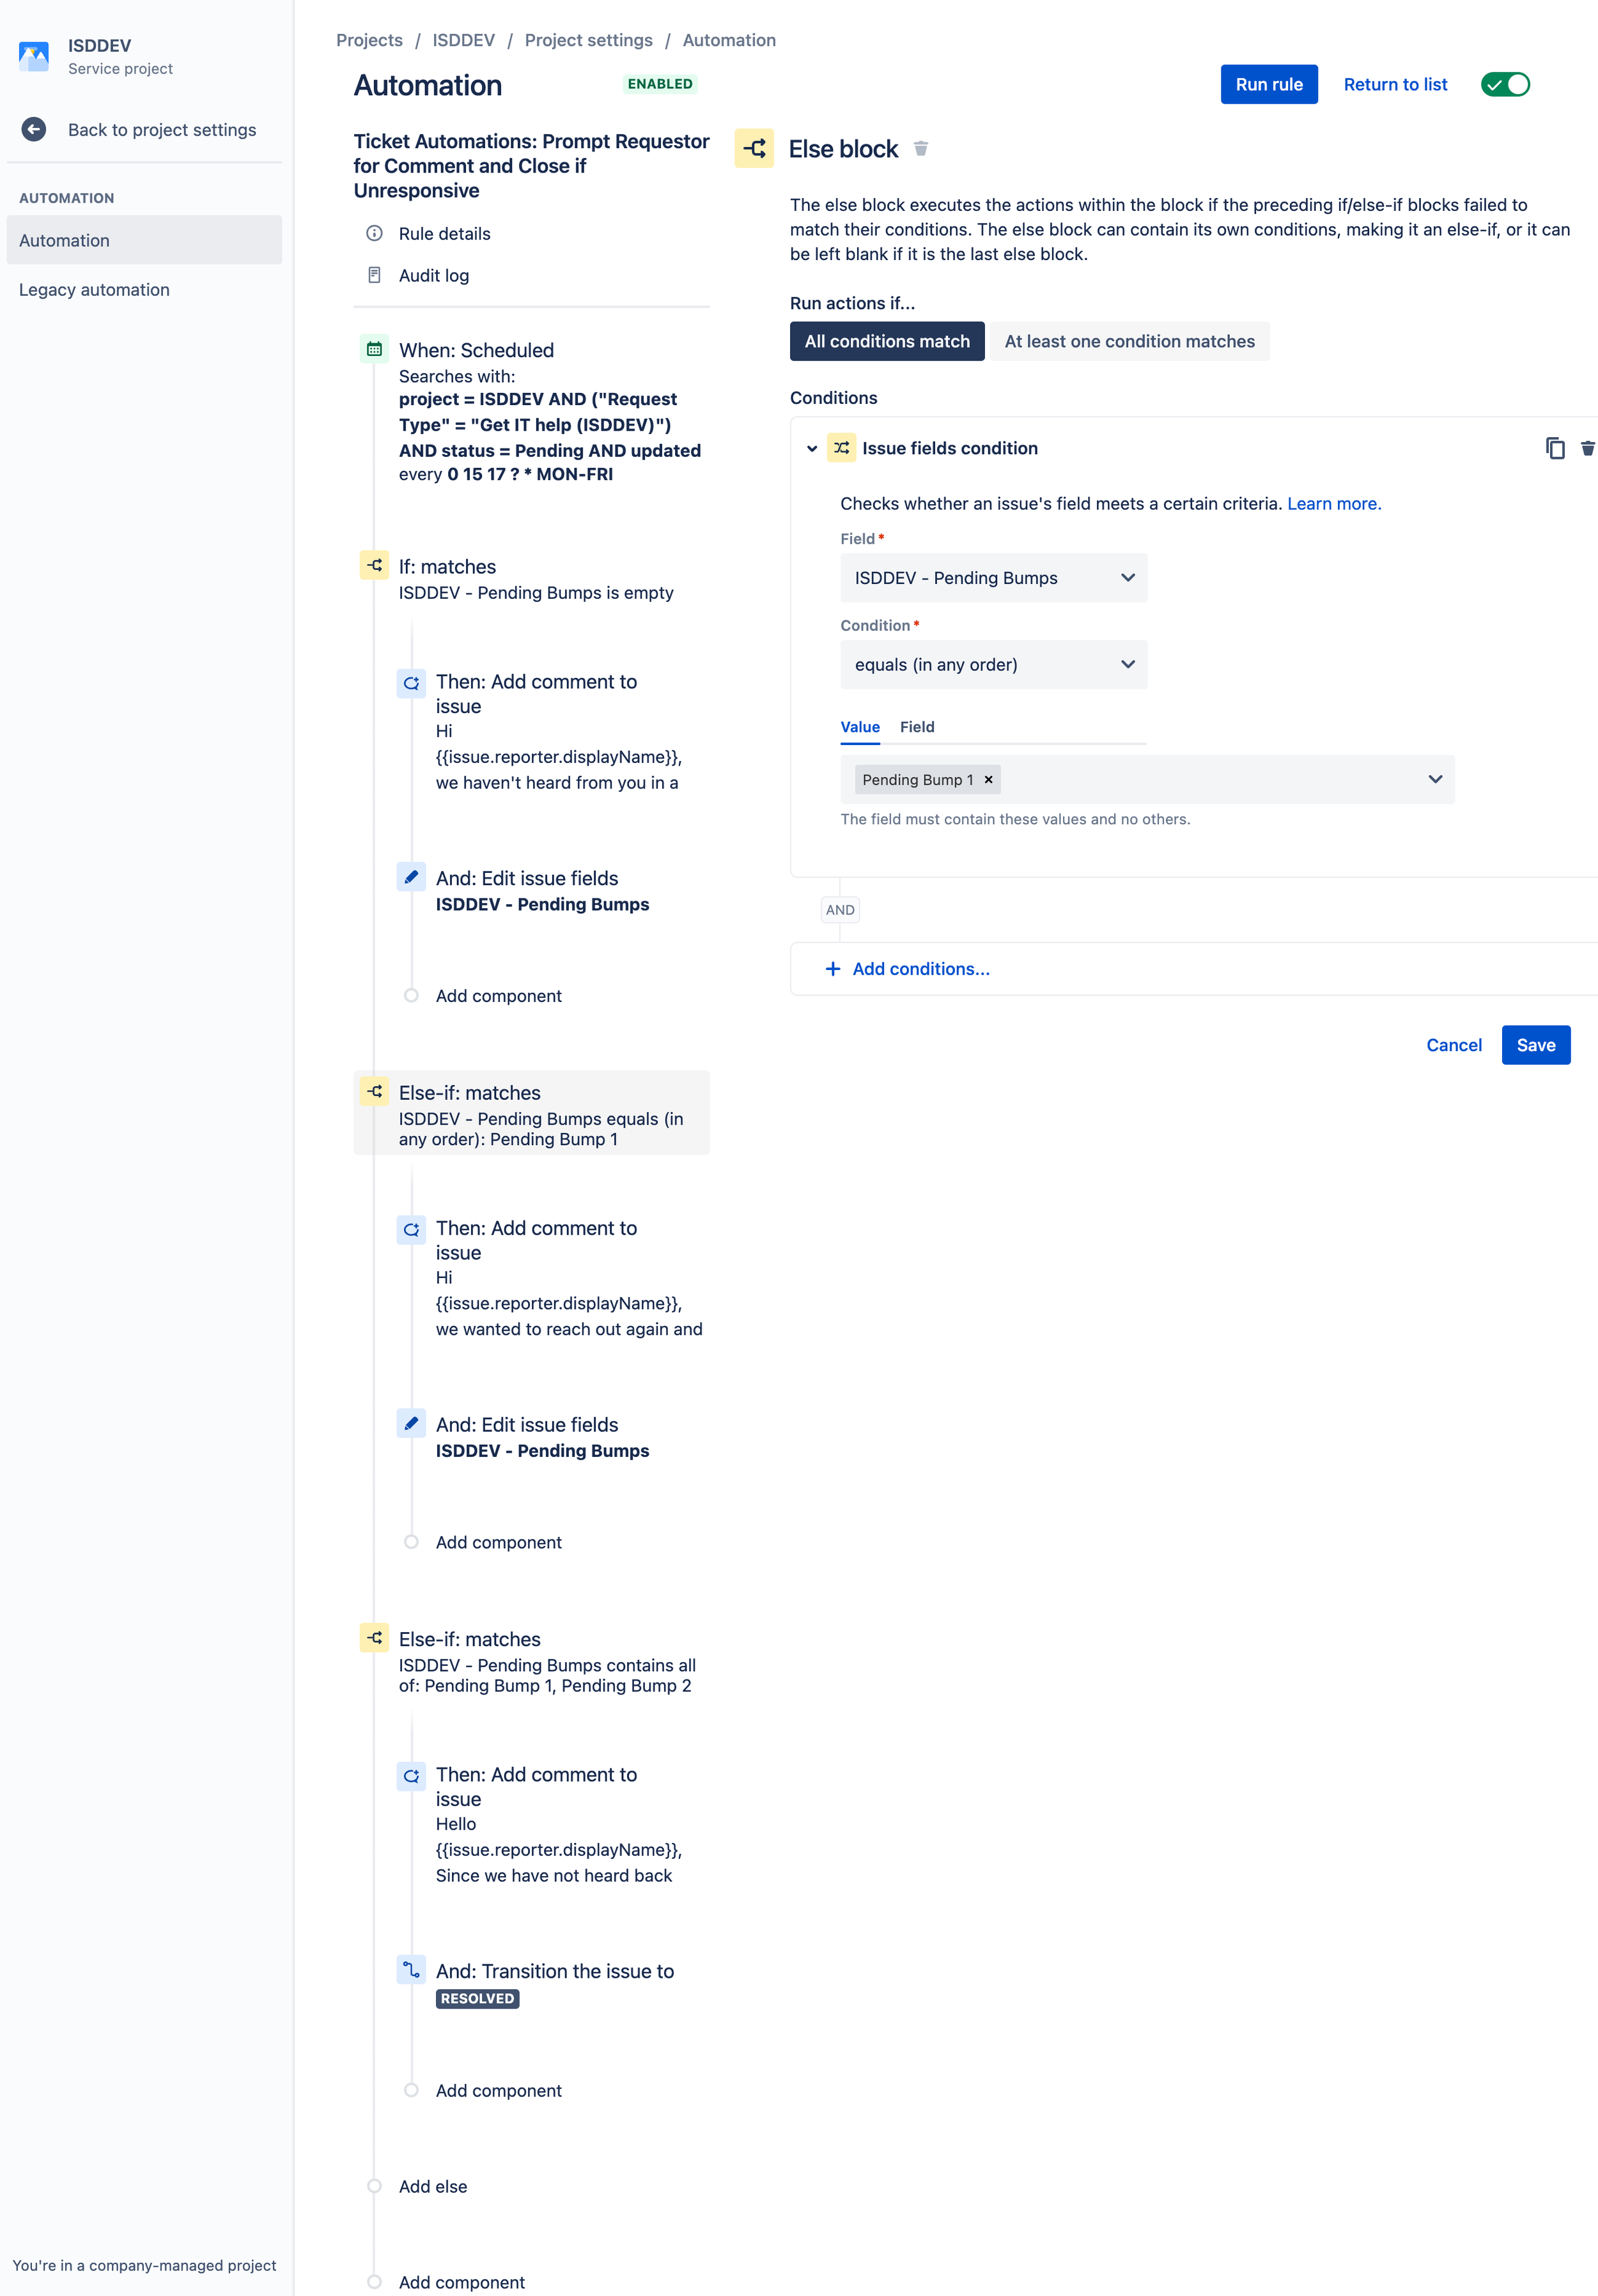
- Create a second If/Else Condition Block
- Set the block to check for the Issue Fields Condition for your custom field and set the condition to "Equals (in Any Order)" - "Pending Bump - 1"
- Add an New Action Component to Comment on the ticket
- Enter your comment and make sure it is publicly visible.
- Add a second New Action Component - Edit Issue
- Choose your Custom Pending Bump Field and Set it to “Pending Bump - 1” & "Pending Bump - 2"
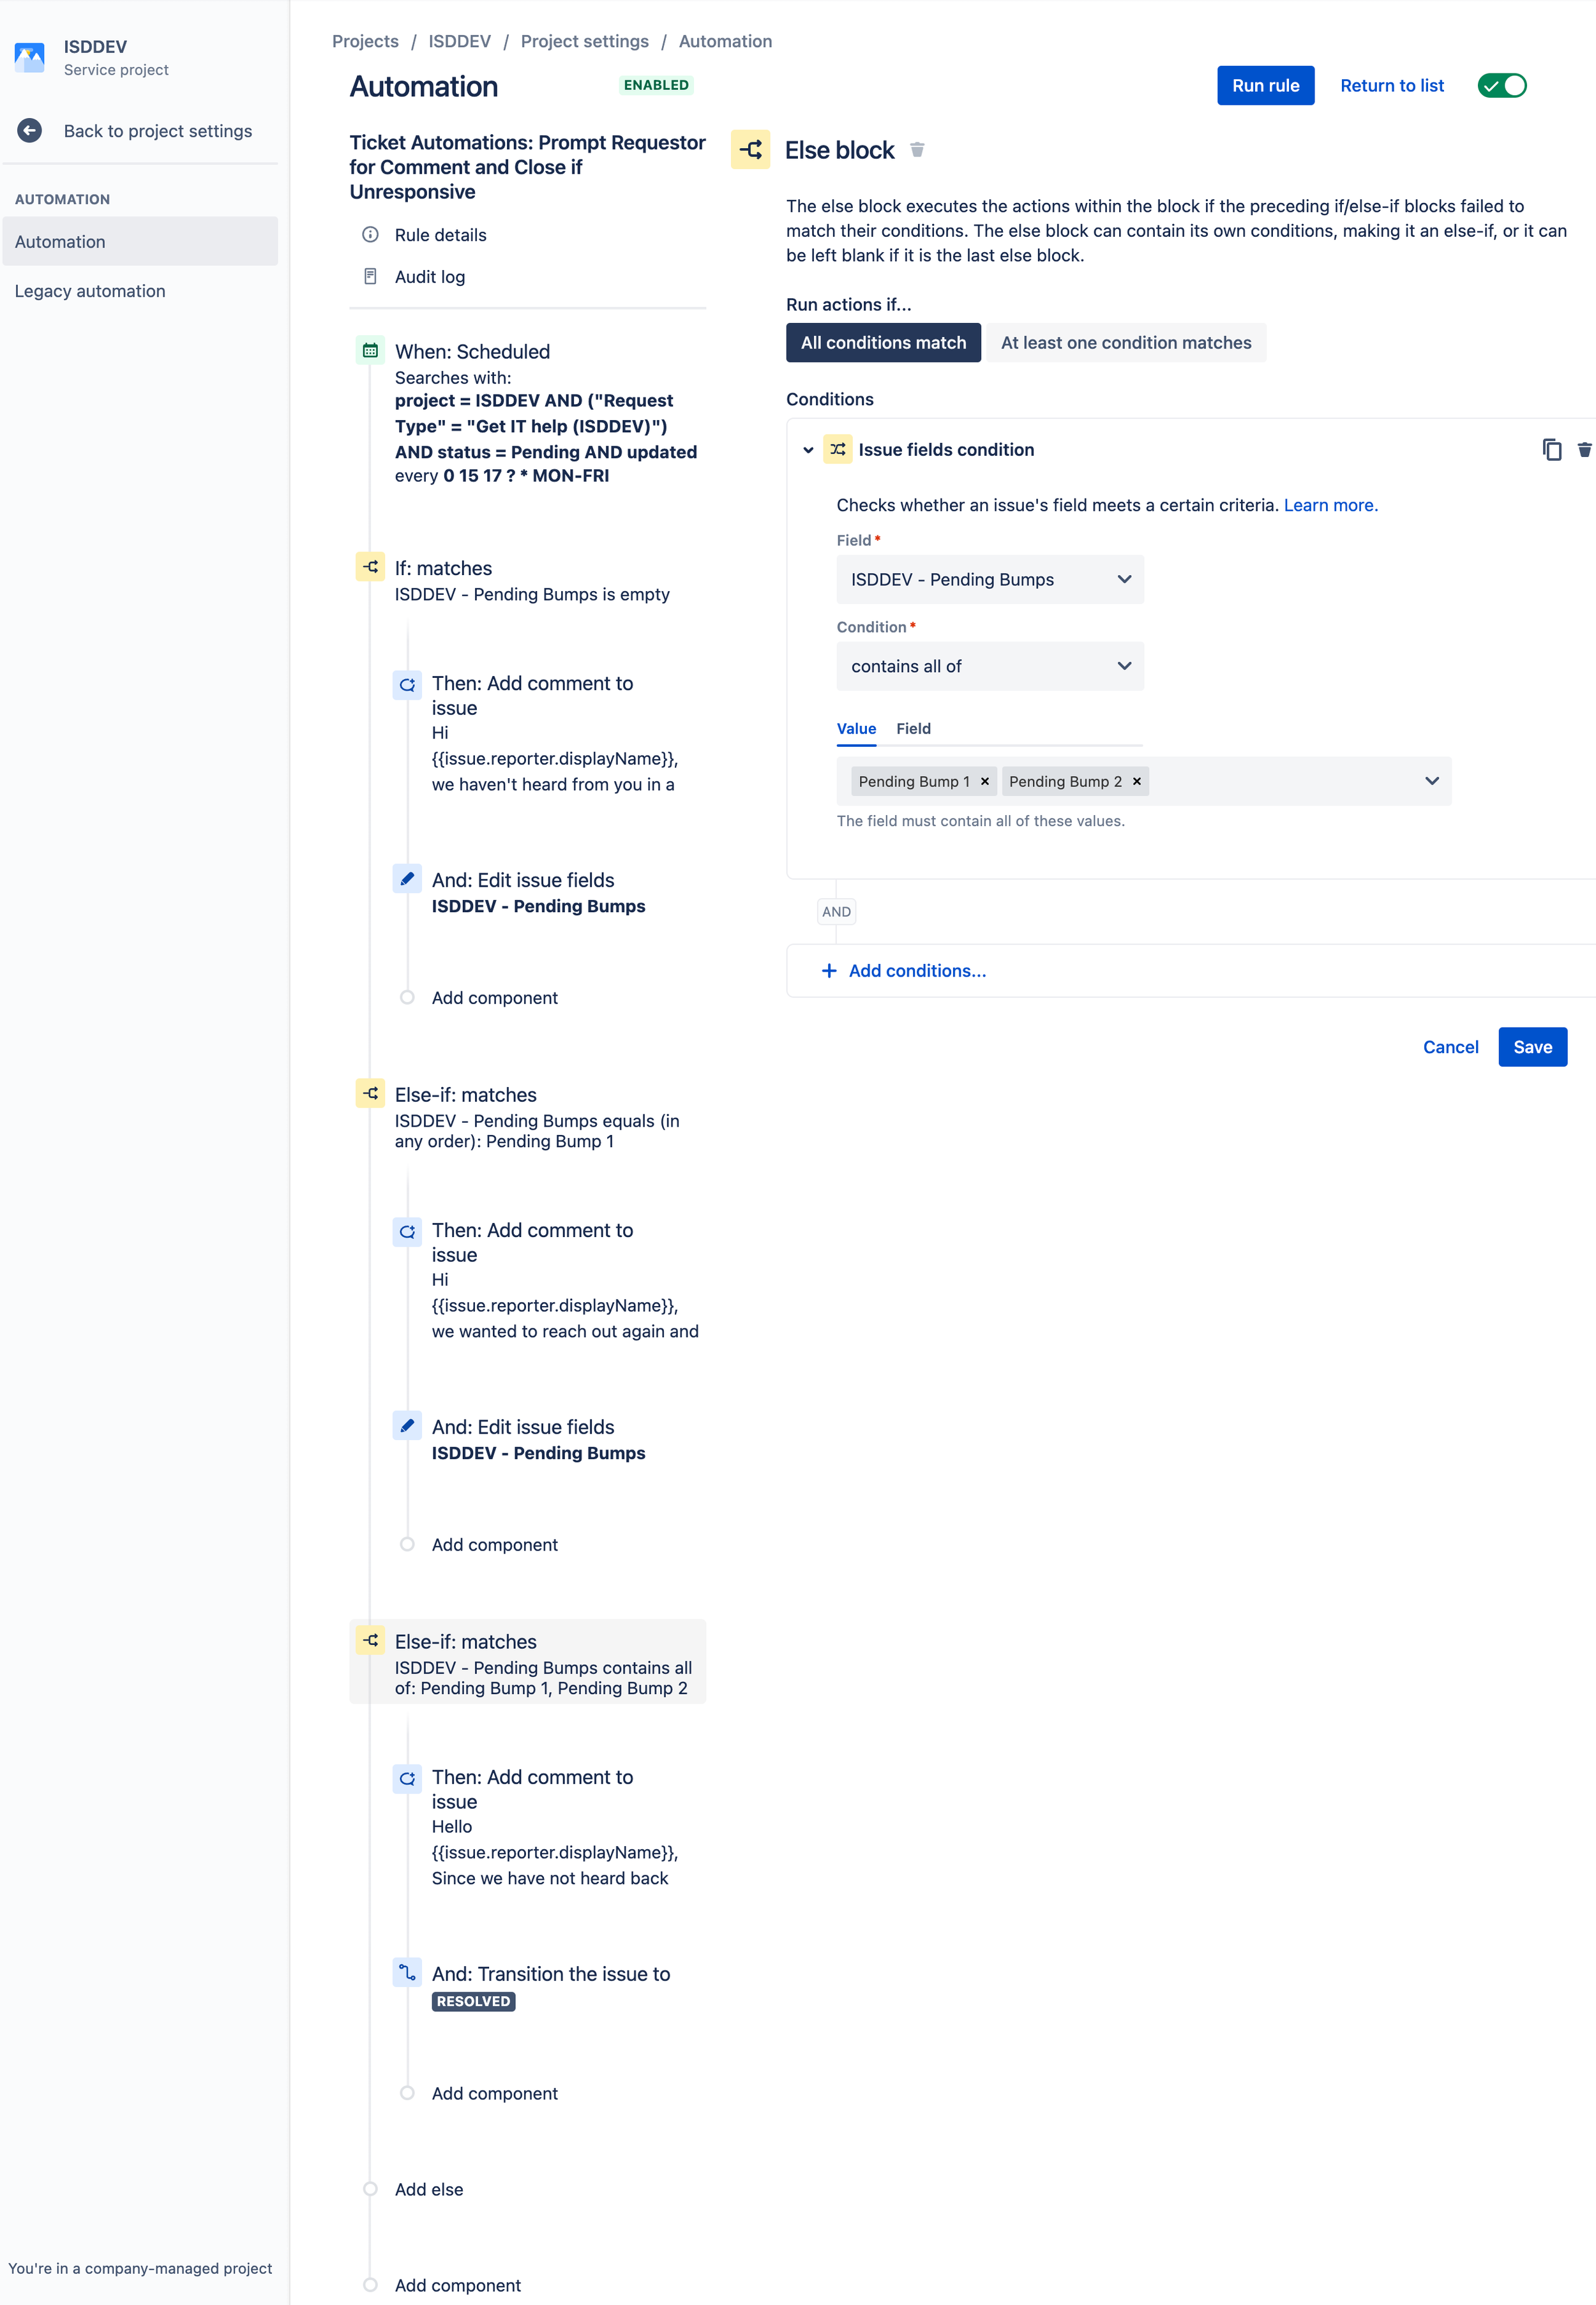
- Create your last If/Else Condition Block
- Set the block to check for the Issue Fields Condition for your custom field and set the condition to "Contains all of" - "Pending Bump - 1 & Pending Bump - 2"
- Add an New Action Component to Comment on the ticket
- Enter your comment and make sure it is publicly visible
- Add a second New Action Component - Transition Issue
- Set the new status to Resolved or Done depending on your workflow
- Select Choose fields to set and select Resolution and set as Done.
- Give your new automation a name and turn it on!


Checking the Automation
Since this automation will take multiple days to set each “Pending Bump” status you’ll need to wait a little while to make sure the automations are working correctly. Setting this up in a DEV/Testing Environment and testing on some fake tickets that you file will ensure that this automation runs correctly before you recreate it in your Production Jira Project. While it’s in this DEV/Testing environment be sure to check the Automation Logs located at the top of the automation page to see how it is being run on tickets.
Automation as a member of the team
Start to think of automation as your secret employee on the team. Adding automations, like the one above, will help your teams avoid the unnecessary leg work of chasing down tickets and allows you to focus on more important tasks within the company. You’ll notice that your reports will start to show a lot more realistic time frames for the tasks at hand. You can even extend this automation using other custom fields or statuses in order to start/stop the automation so you are in control of how it runs. The more you being to automate the more you’ll notice improvements across the board. Your team will be happier, as they can focus on improving their abilities instead of tending to menial tasks; your fellow employees are happier, because of the attention to detail your team shows them; and you will build trust with upper-management that you are making worthwhile change. Automations are your secret weapon, and hopefully the above write-up helps you starts to unlock them.