
Automate Okta Access with Jira Service Management

I’m just going to jump straight into this one. One thing everyone hates is a blog post that has some long drawn out introduction with a bunch of stuff you have to skip over to get to the content you want. So, in short, this blog covers how to use Jira Service Management Automations and the Okta API to add users to groups and thus provision them access to the downstream applications those groups are tied to. Let’s get to it!
Prerequisites
You are an Okta Administrator.
For this we are using an account with Super Admin Permissions, but Group Admin or Org Admin are sufficient - always good to scope a service account with least required permissions for Production.
You are a Jira Service Management Administrator.
This blog assumes that you are already using an approval step for access requests in Jira Automation.
This blog also assumes that you already have Components in Jira for your Applications in Okta.
Step 1: Generating an Okta API Token
Navigate to your Okta Admin Dashboard. Once you’ve logged in go over to Security > API Tokens and click Create Token give that token a name like “Jira/Okta Automated Provisioning” or something similar, then click Create Token.
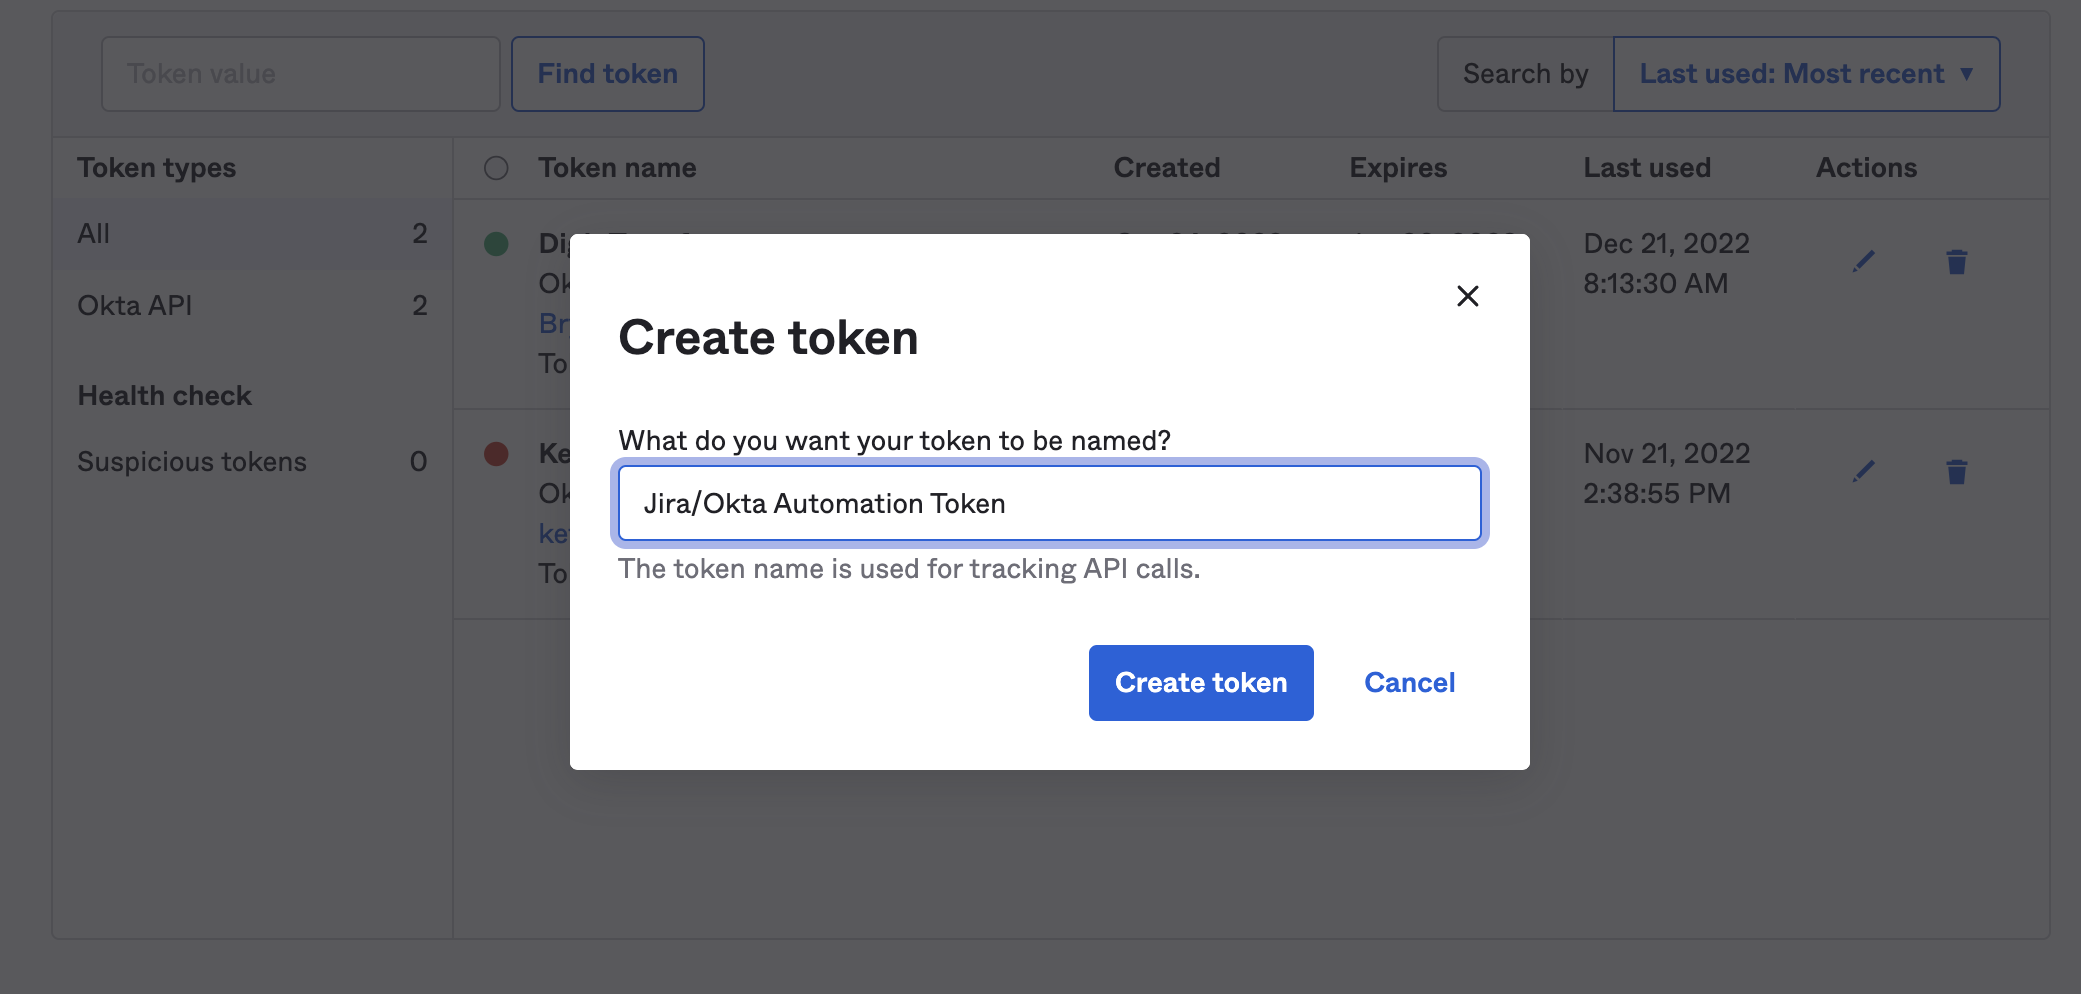
At this point I would recommend Storing this token in a service like 1Password, as we’ll need to reference it later in Jira, but we also want it in a secure encrypted place. Once we’ve securely stored the API Token for Jira we’ll go over to Groups and find the group that we want to sync. For this example, I’m using a group called "GSuite_employees".
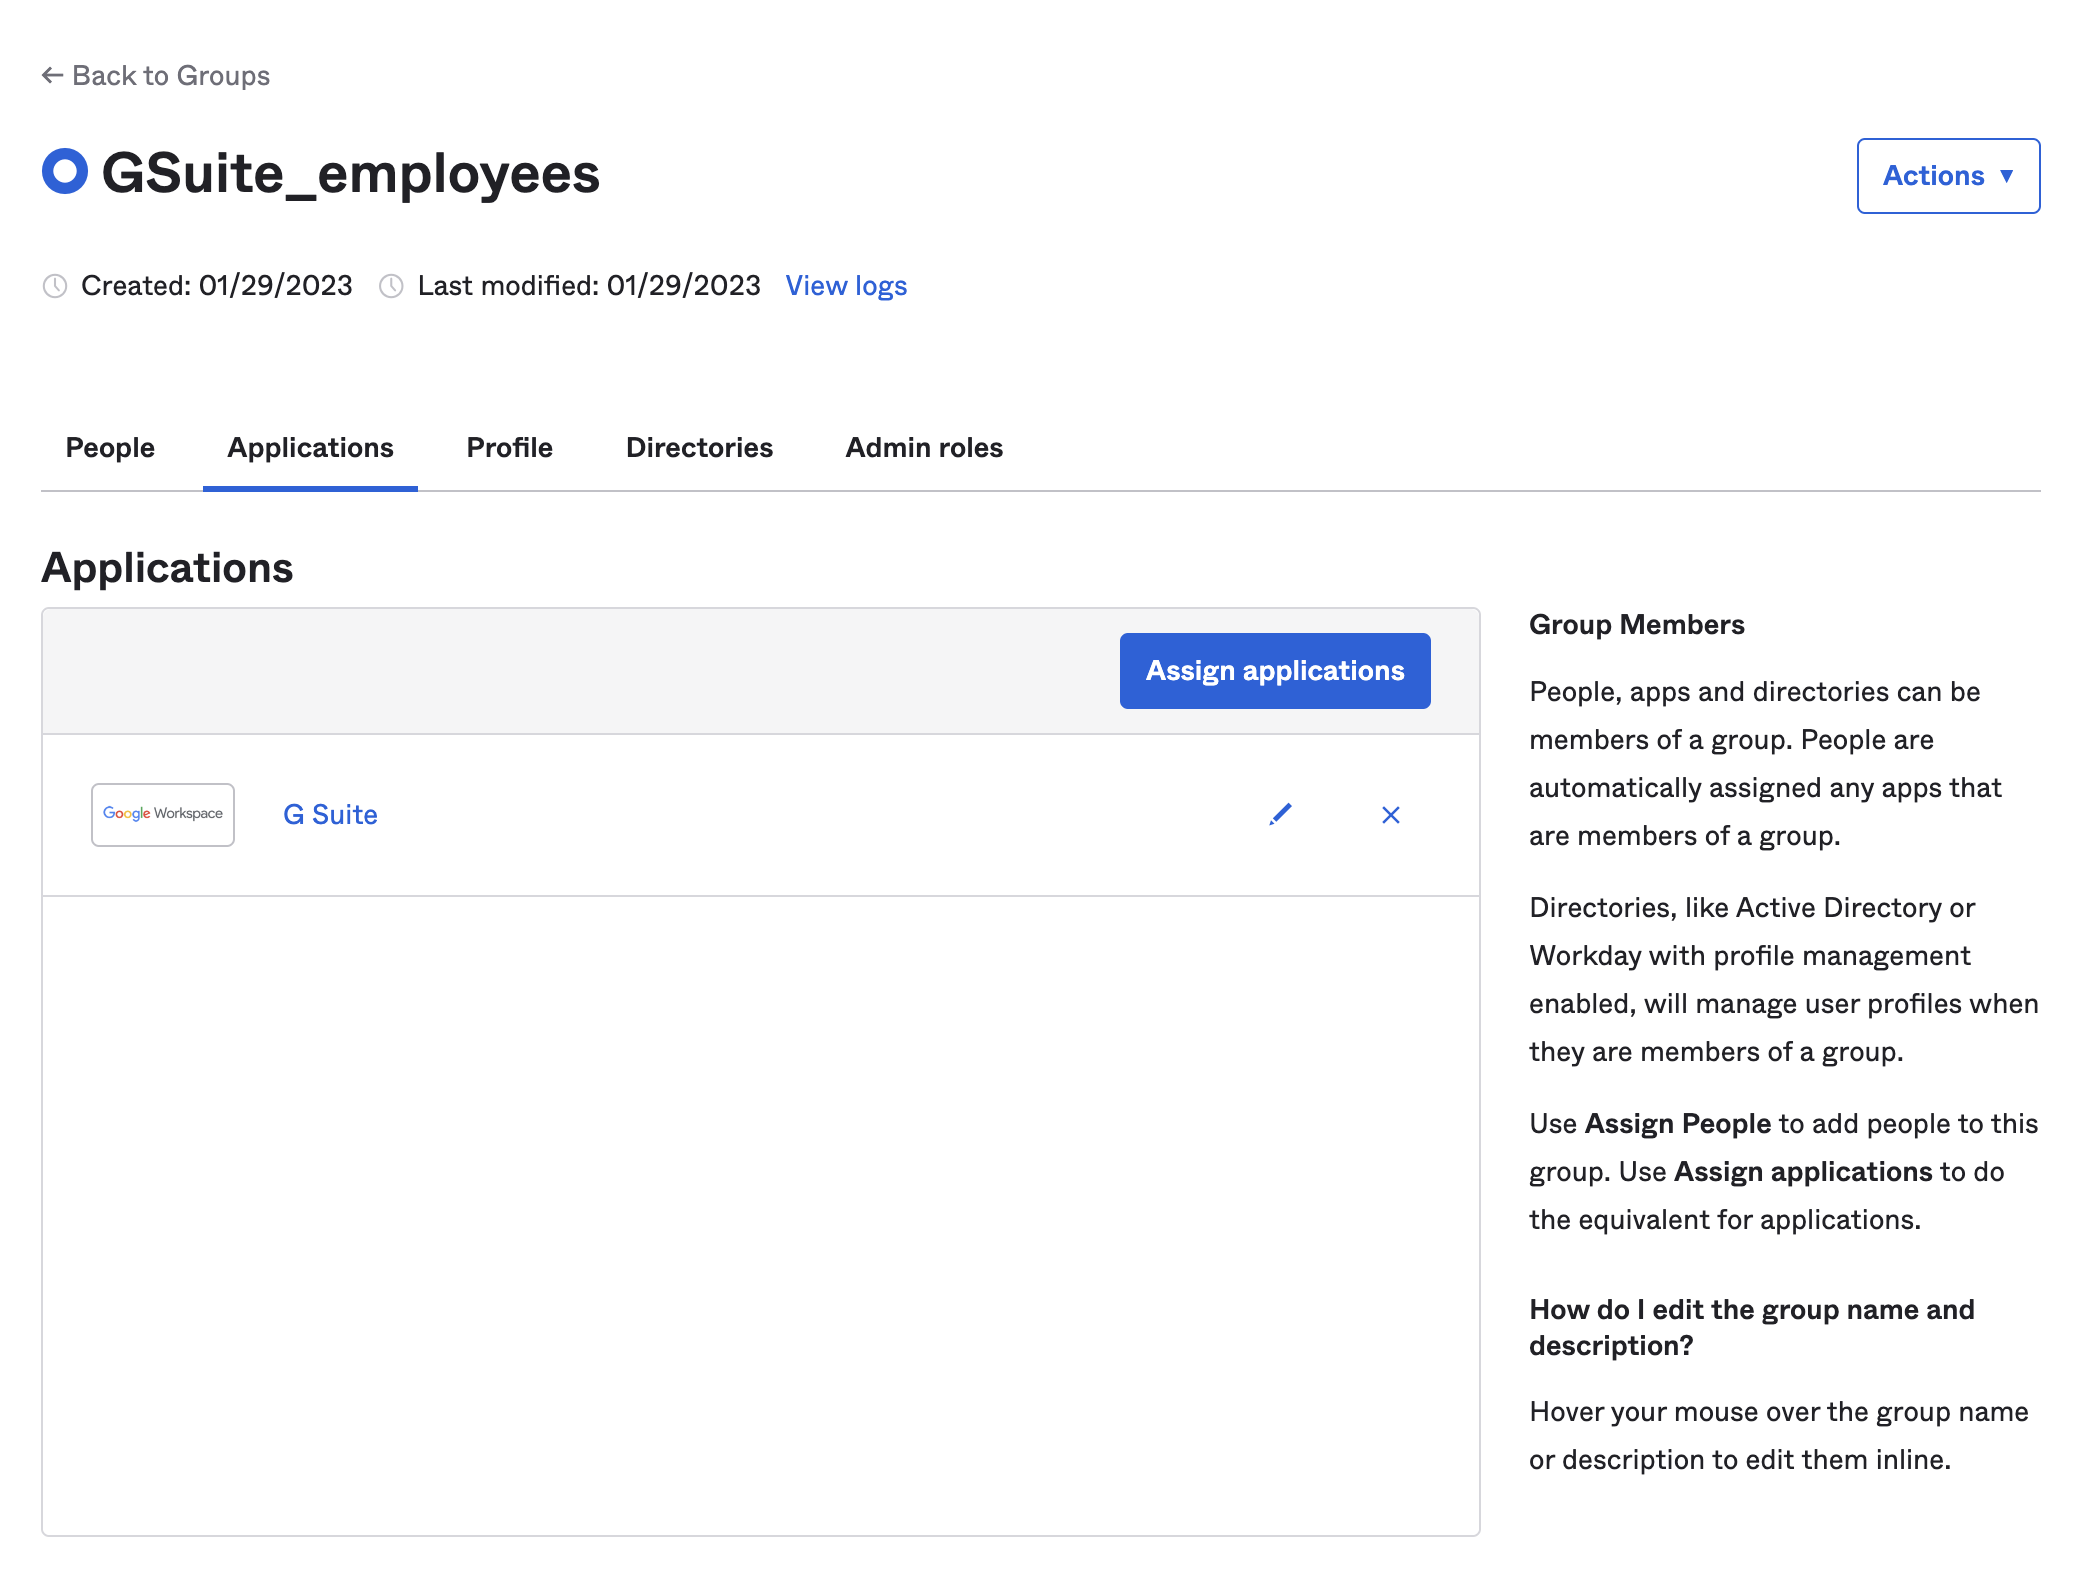
Step 2: Assign the Okta Application to the Okta Group
While in the Okta Administration Portal, Navigate to the Directory > Groups and search for the Group you want to use in this automation. Click the Applications tab under the group name and assign the Application you want to provision via the Jira Automation we’ll build in Step 4.
Make sure the Application that correpsonds with the component in Jira is assigned to the Group. i.e. our componant name in Jira is “GSuite” and we’ve also assigned the GSuite Okta Connector (chiclet) to the group GSuite_employees that we’ve created.
Step 3: Find the Okta Group ID
While we are on the group page in Okta we can also grab the Group ID from the URL. The Group ID is trailing at the end of the URL:
https://{{mysubdomain}}.okta.com/admin/group/{{group_id}}
Copy this Group ID and paste it in a text editor or a note pad as we’ll use it in Step 4. Save any changes in Okta.
We’ll use the Group ID in the next step to during creation of the Jira Automation. Keep in mind that you will need the Group ID for each group you plan to create an automation for. You can get this programmatically using the API by following the documentation outlined in Okta’s API Docs.
Be sure that your Group is linked to the Application you are provisioning into and any specific Okta App. Setting user profile attributes for the group can also help differentiate between multiple license types for downstream applications (this is bonus stuff we aren’t covering in depth in this blog.) Otherwise your automation will just add people to a group, but not give them access to any applications.
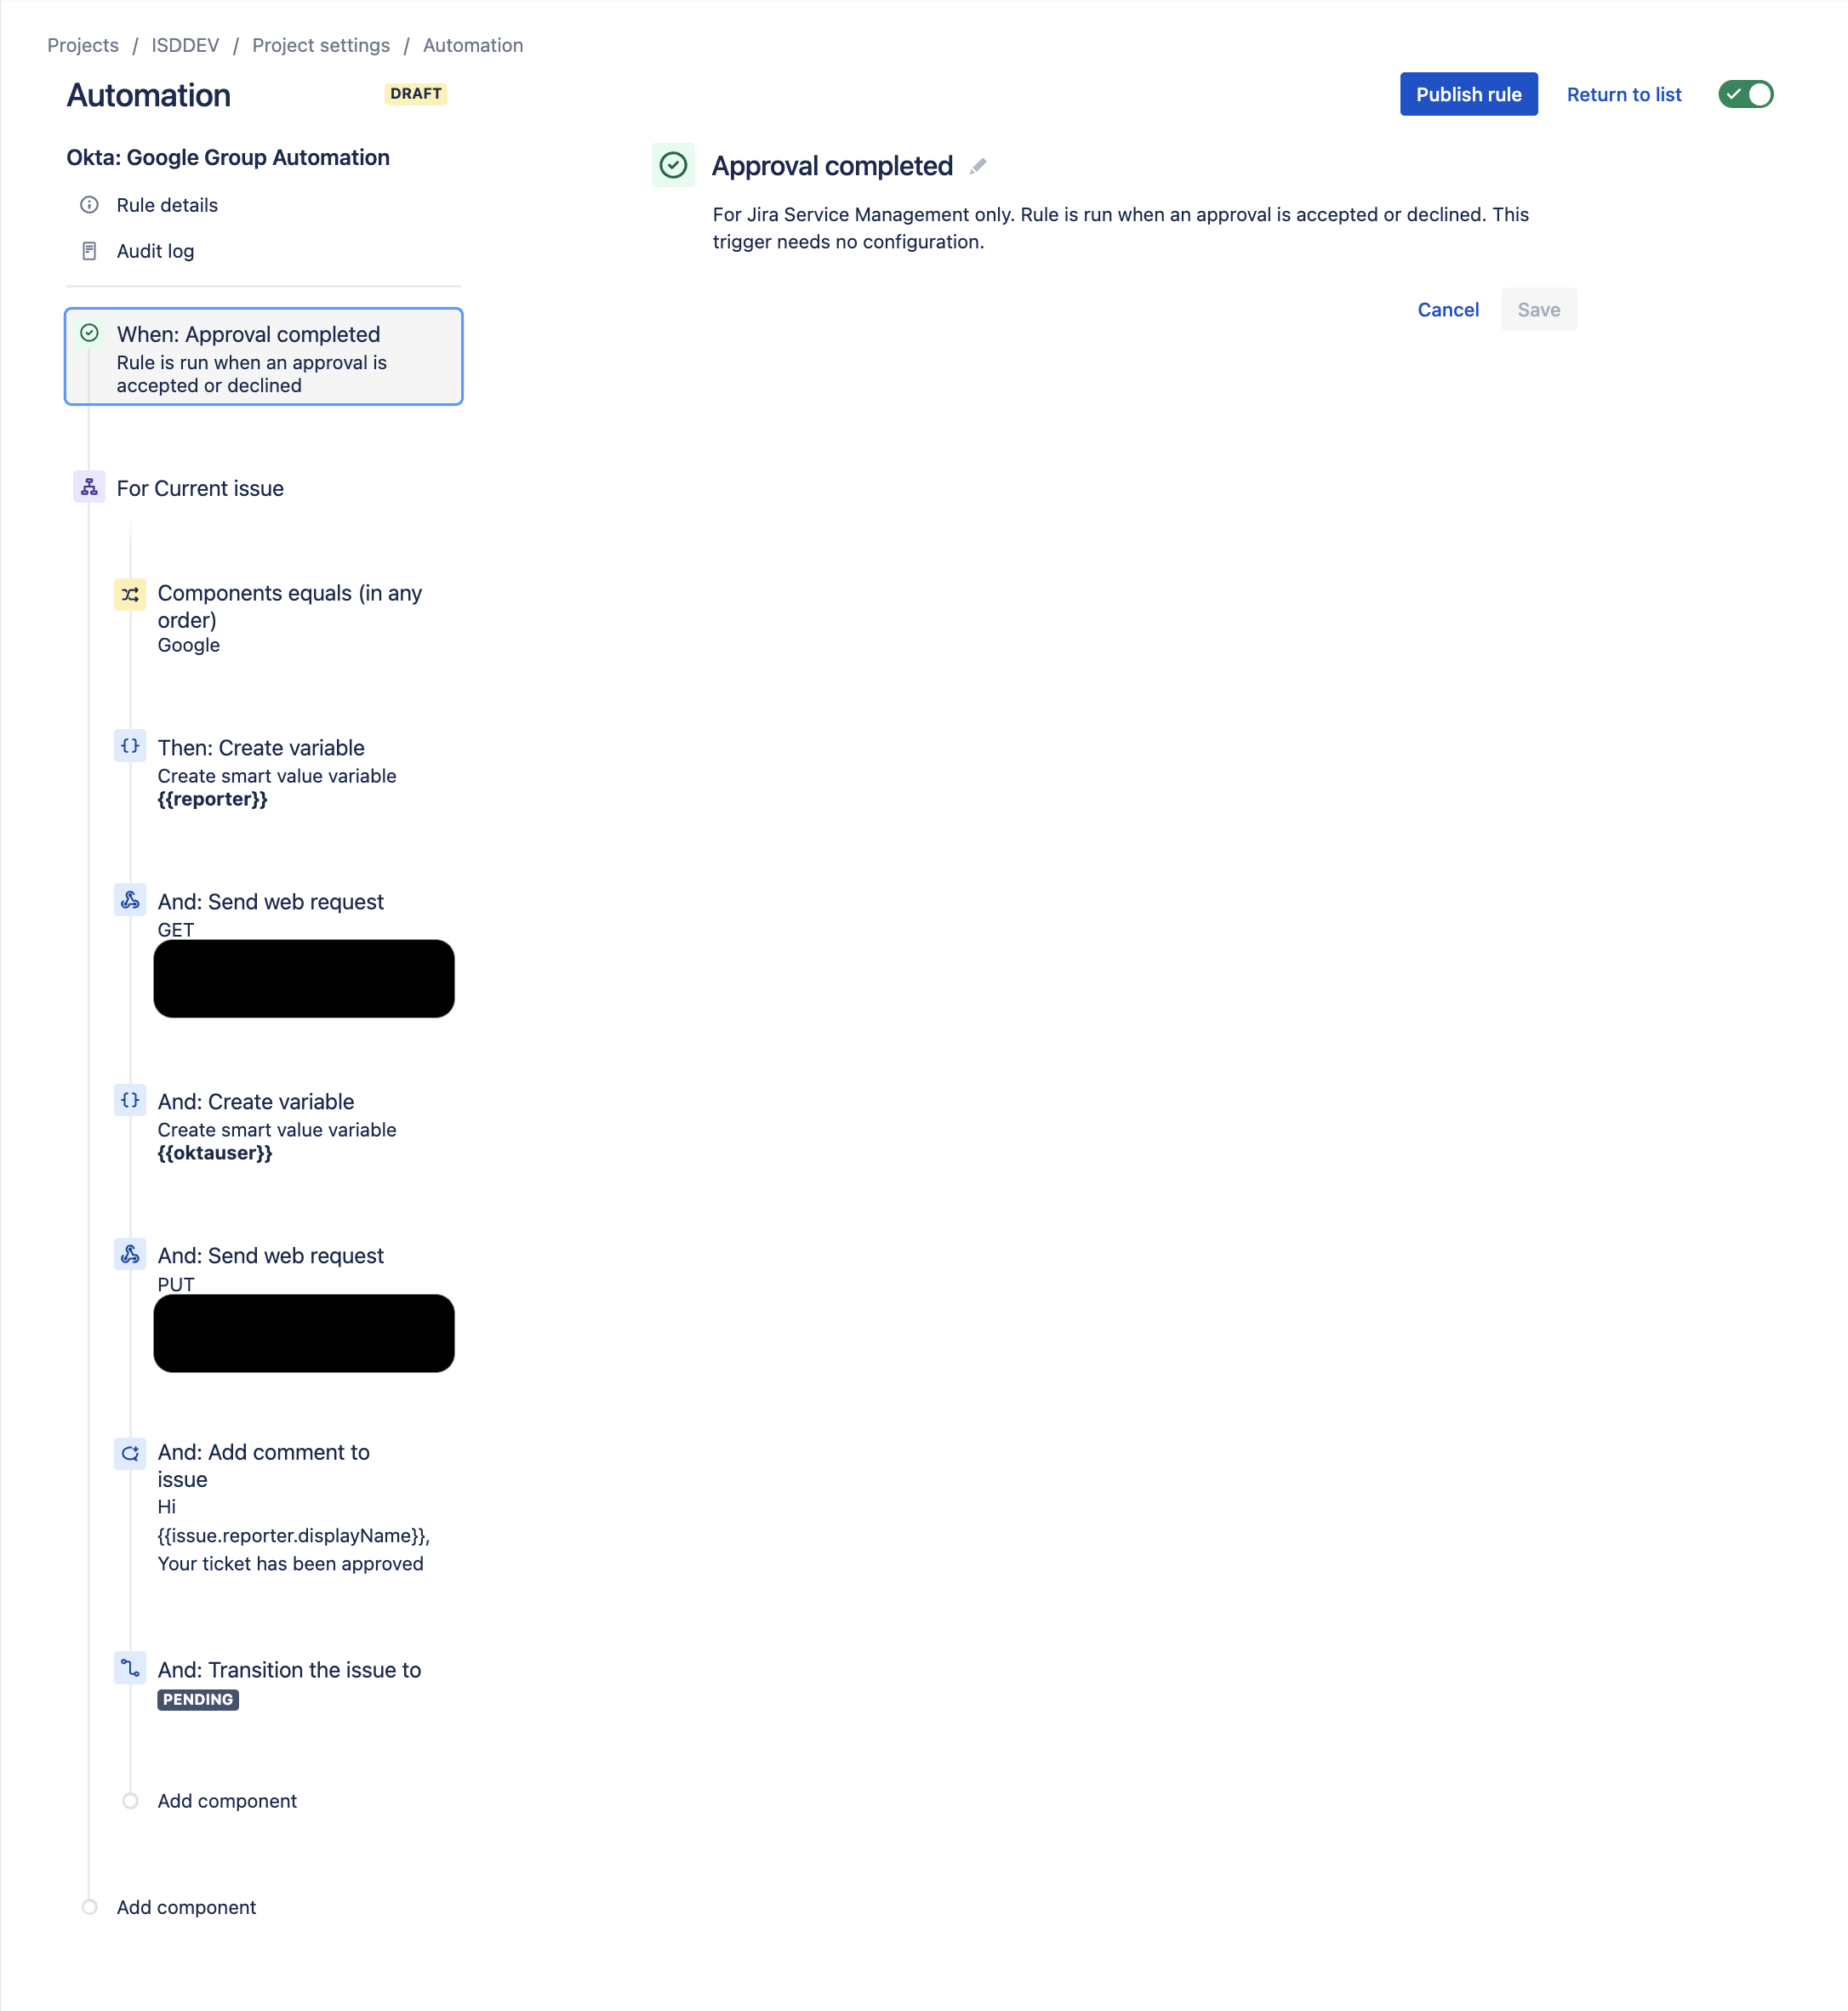
Step 4: Creating the Jira Automation
The below step by step instructions correspond to the screenshots in the gallery below
- Once in Jira Automation, Create an automation using the trigger: Approval completed
- Select Branch Rule / Related issues and set to Current Issue
- Create a new Issue Fields condition check component
- Set the Following:
- Field = Components
- Condition = Equals (in any order)
- Value = {{Name of your Component}}
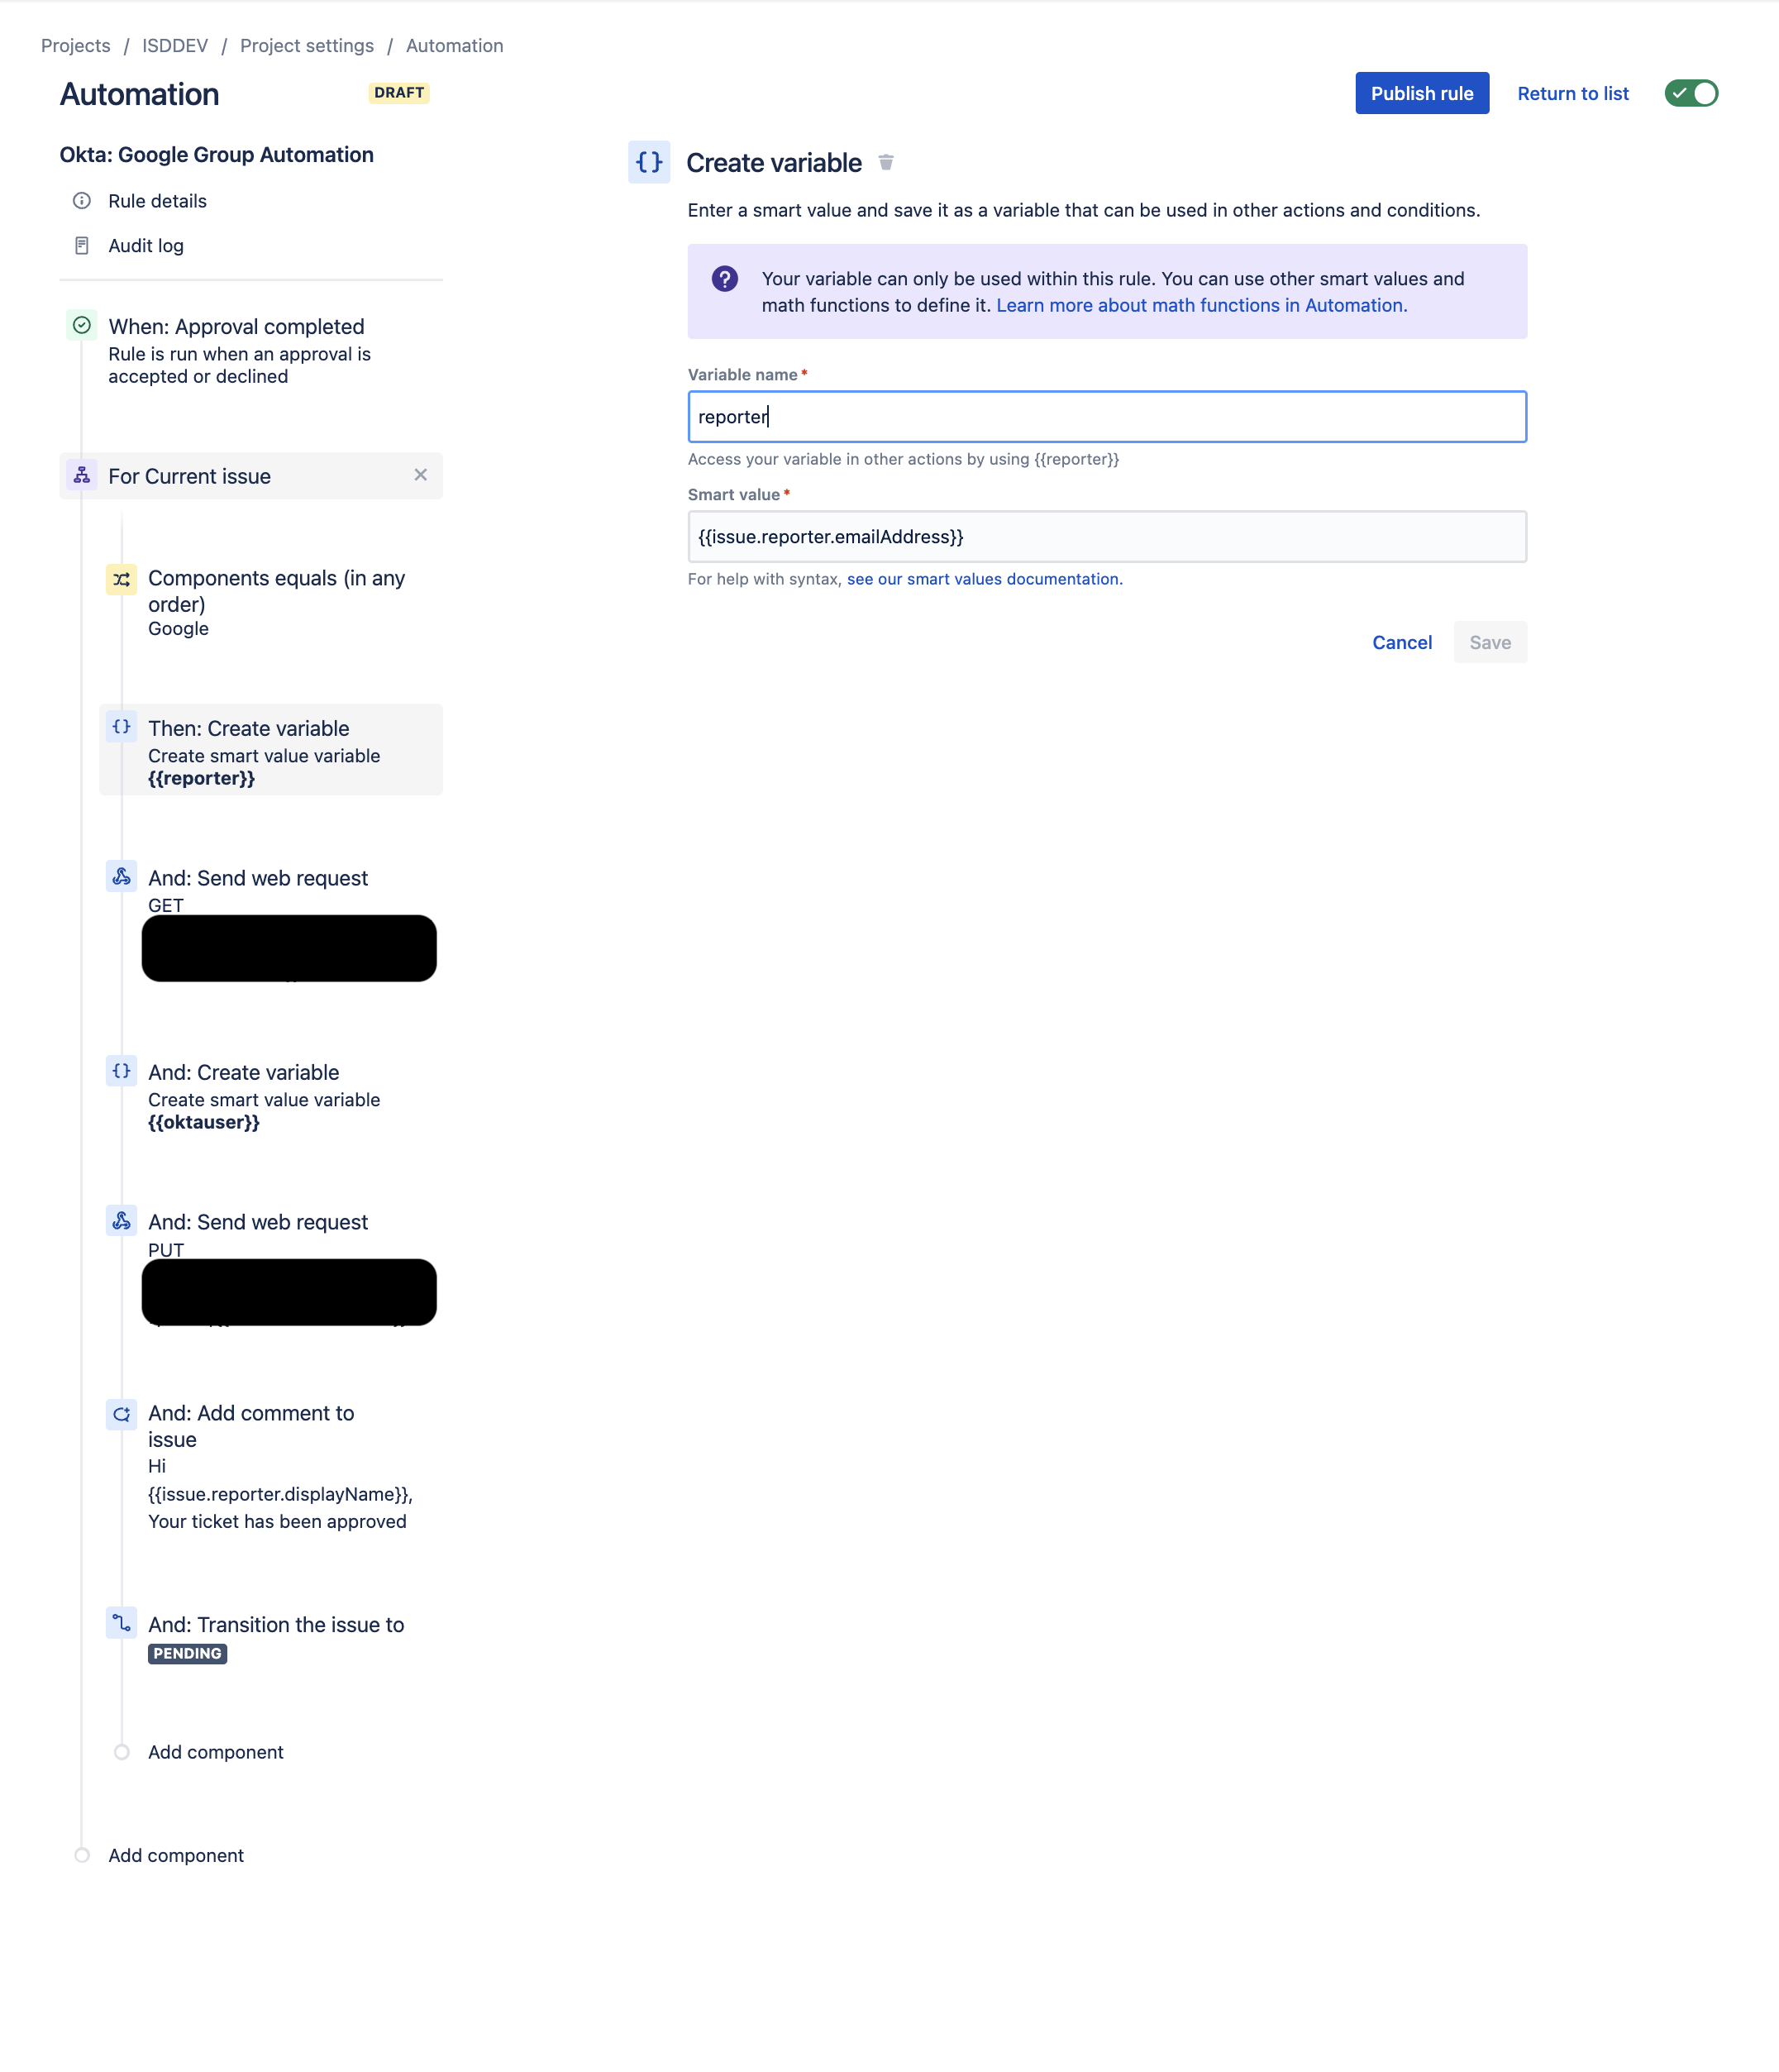
- Set the Following:
- Create a new Variable Component to get the email address of the issue reporter:
- Variable name = reporter
- Smart Value = {{issue.reporter.emailAddress}}
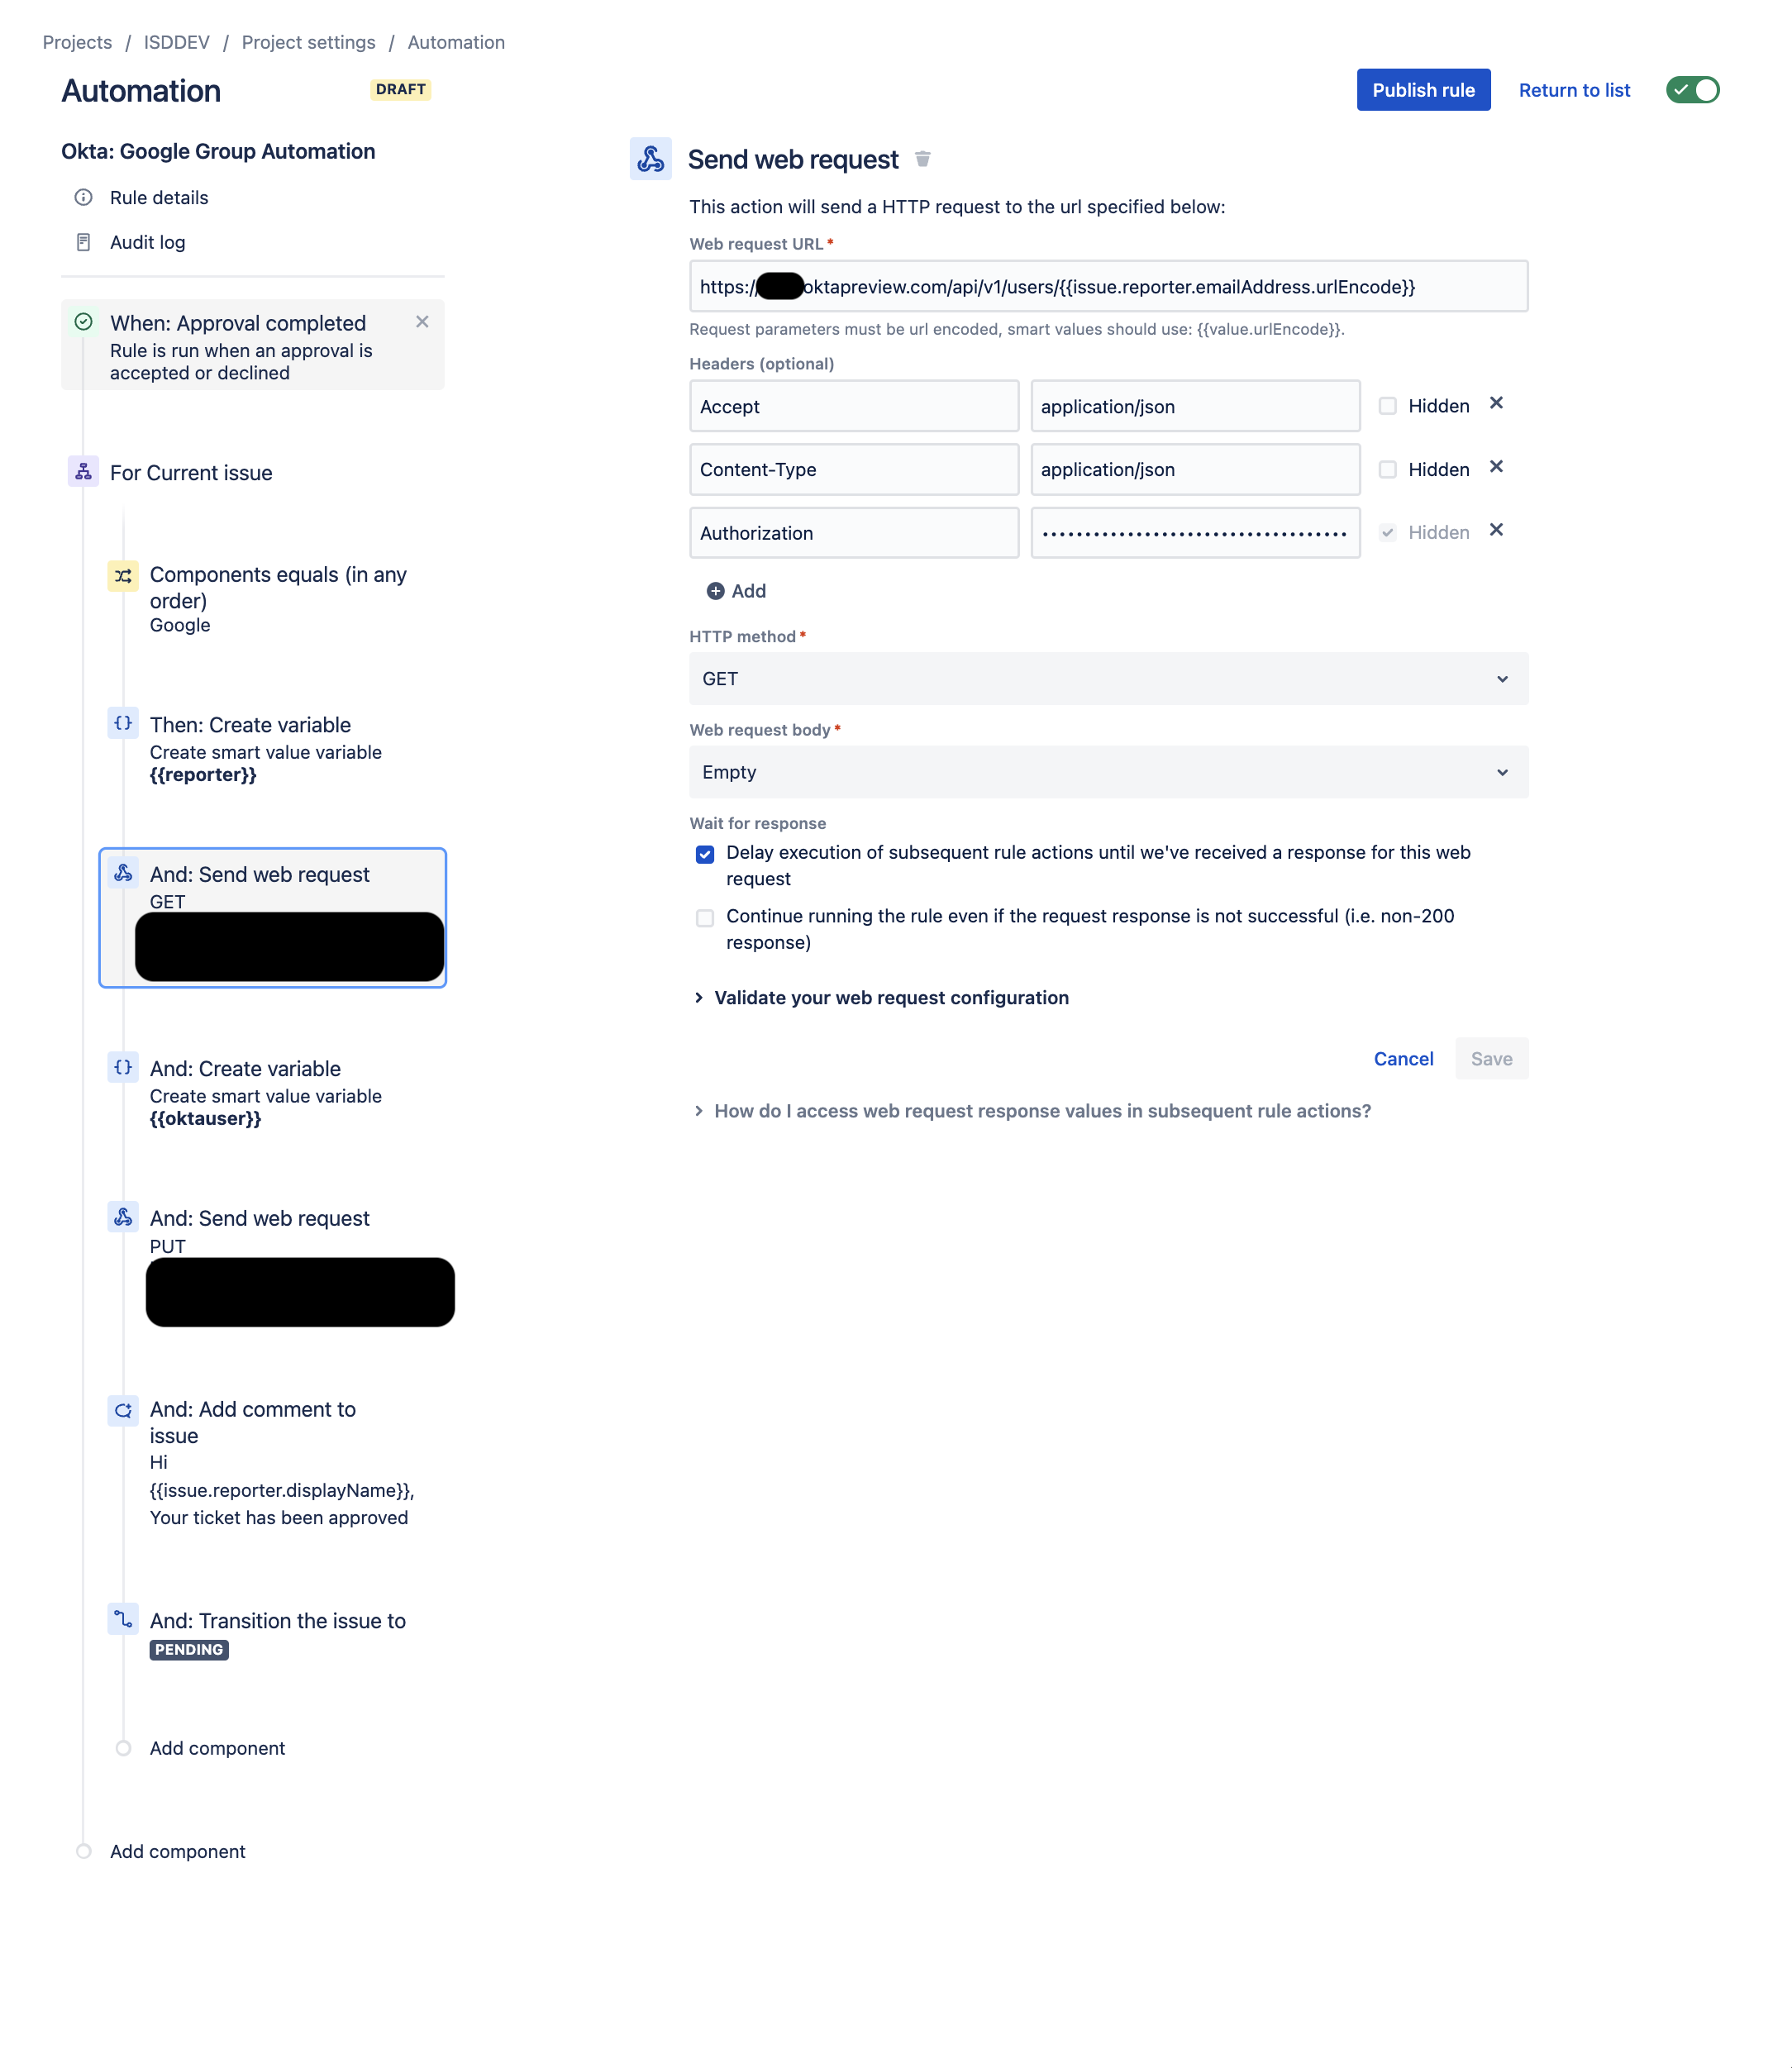
- Create a Send web Request component for your Jira Automation
- Set your Web Request URL:
https://{{mysubdomain}}.okta.com/api/v1/users/{{issue.reporter.emailAddress.urlEncode}}- Note, the first {{mysubdomain}} variable does not need the brackets, but the second one does, as we are calling a smart value in Jira.
- Fill in the following Headers
- Accept = application/json
- Content-Type = application/json
- Authorization = SSWS {{Your_Okta_Api_Token}}
- HTTP Method = GET
- Web request body = Empty
- Wait for response = Delay execution of subsequent rule actions...
- This is importent as we do not want the rule to proceed until we get a valid response from the API call to Okta
- Set your Web Request URL:
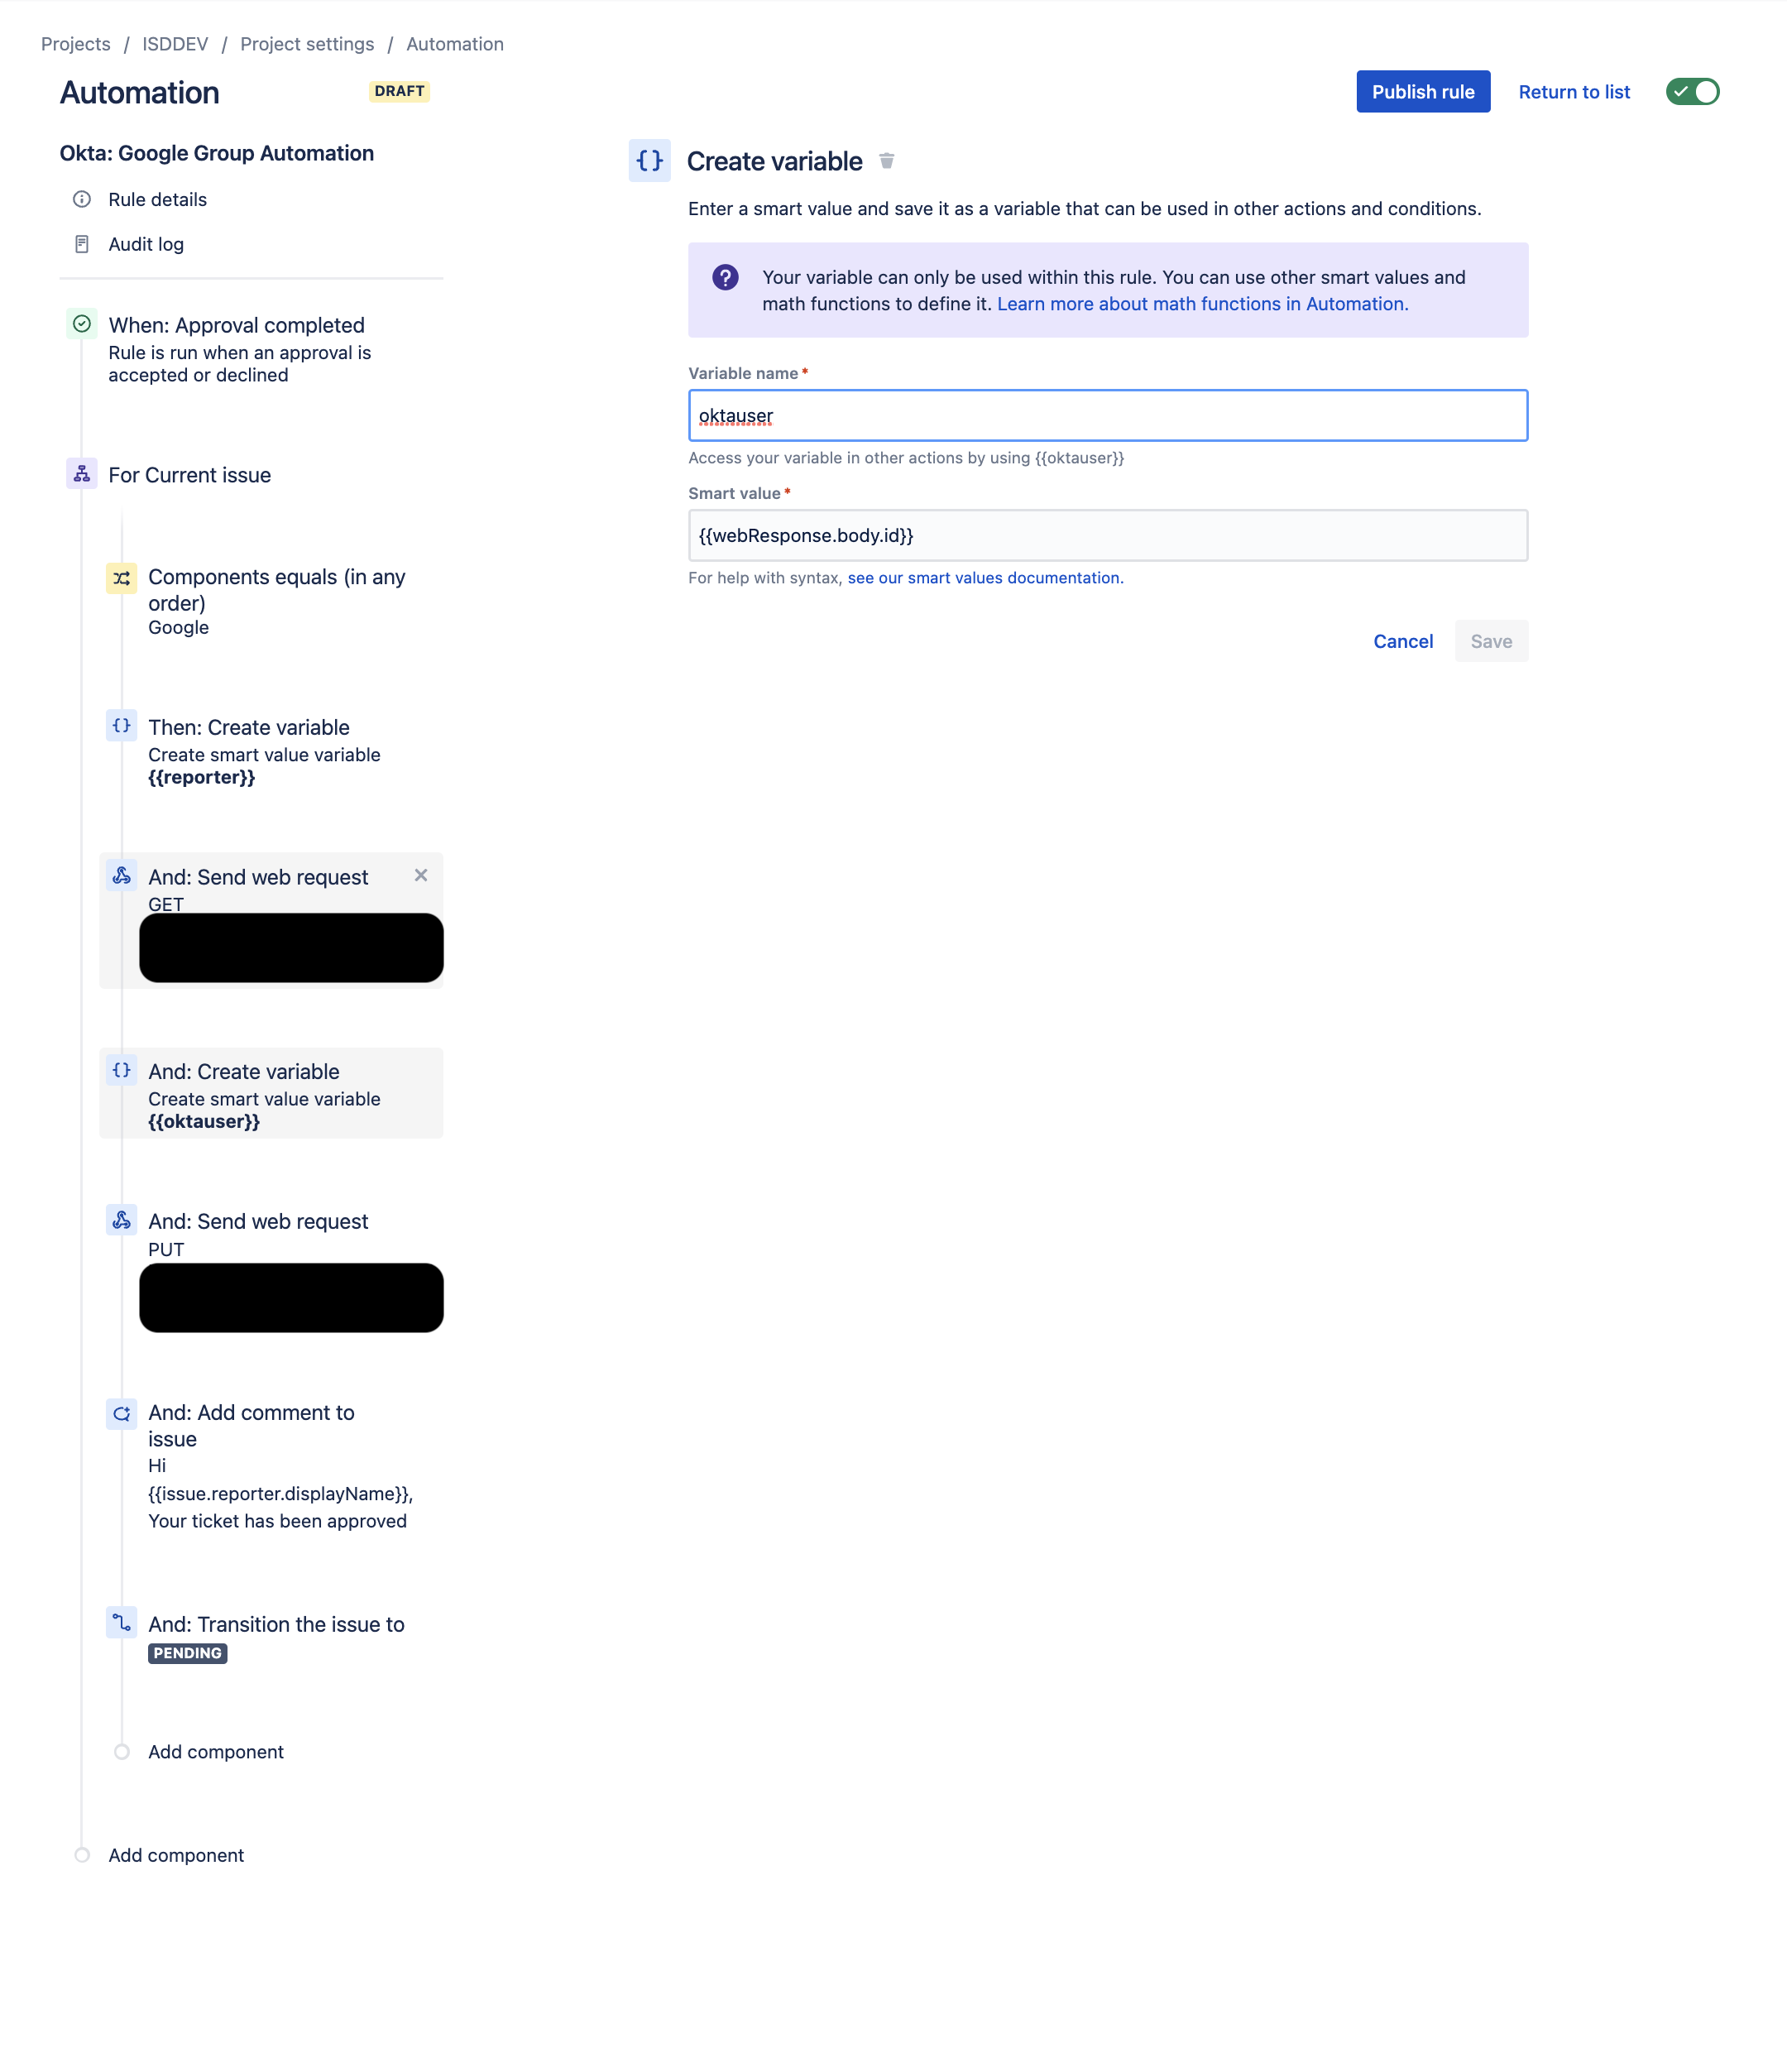
- Create a new Variable component to pull the Okta ID of the user
- Variable name = oktauser
- Smart Value = {{webResponse.body.id}}
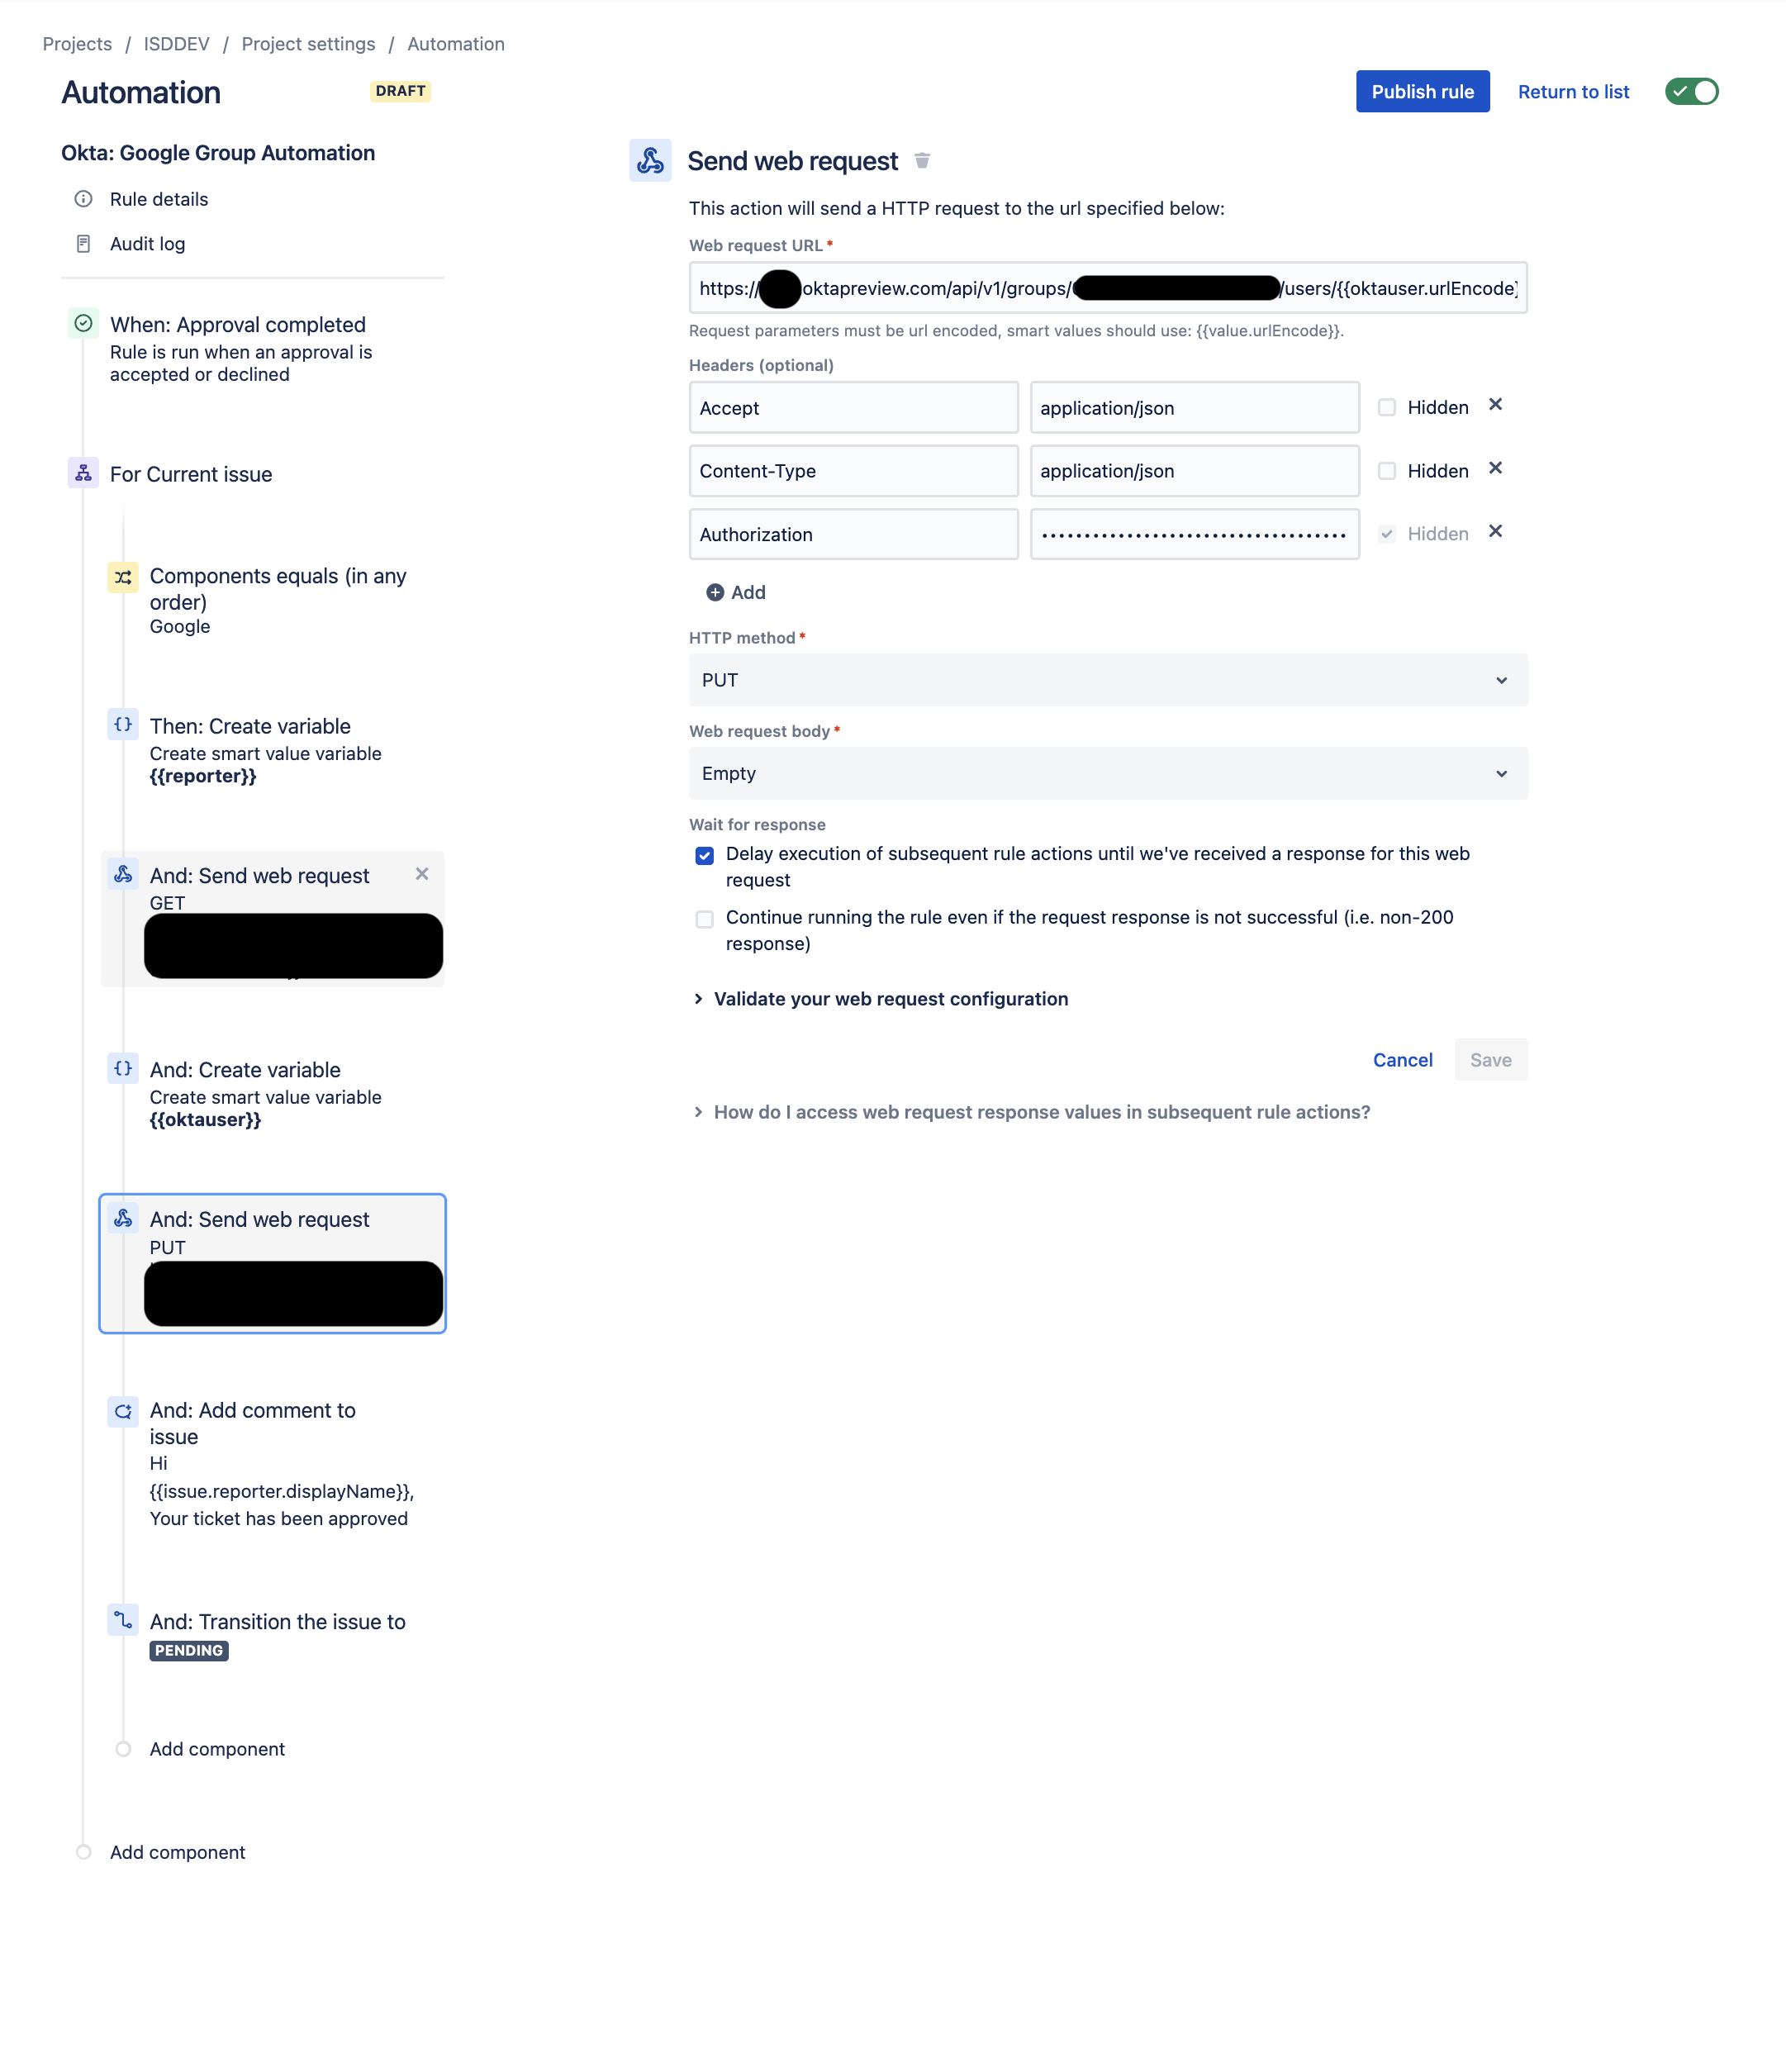
- Create a second Send Web Request component for your Automation
- Set your Web Request URL (we'll use the Okta GroupID from Section 1 of this blog in the URL and the Jira Smart Value variable oktauser from Step 6 directly above)
https://{{mysubdomain}}.okta.com/api/v1/groups/{{Okta_Group_ID}}/users/{{oktauser.urlEncode}}
- Fill in the following Headers
- Accept = application/json
- Content-Type = application/json
- Authorization = SSWS {{Your_Okta_Api_Token}}
- HTTP Method = PUT
- Web request body = Empty
- Wait for response = Delay execution of subsequent rule actions...
- Set your Web Request URL (we'll use the Okta GroupID from Section 1 of this blog in the URL and the Jira Smart Value variable oktauser from Step 6 directly above)
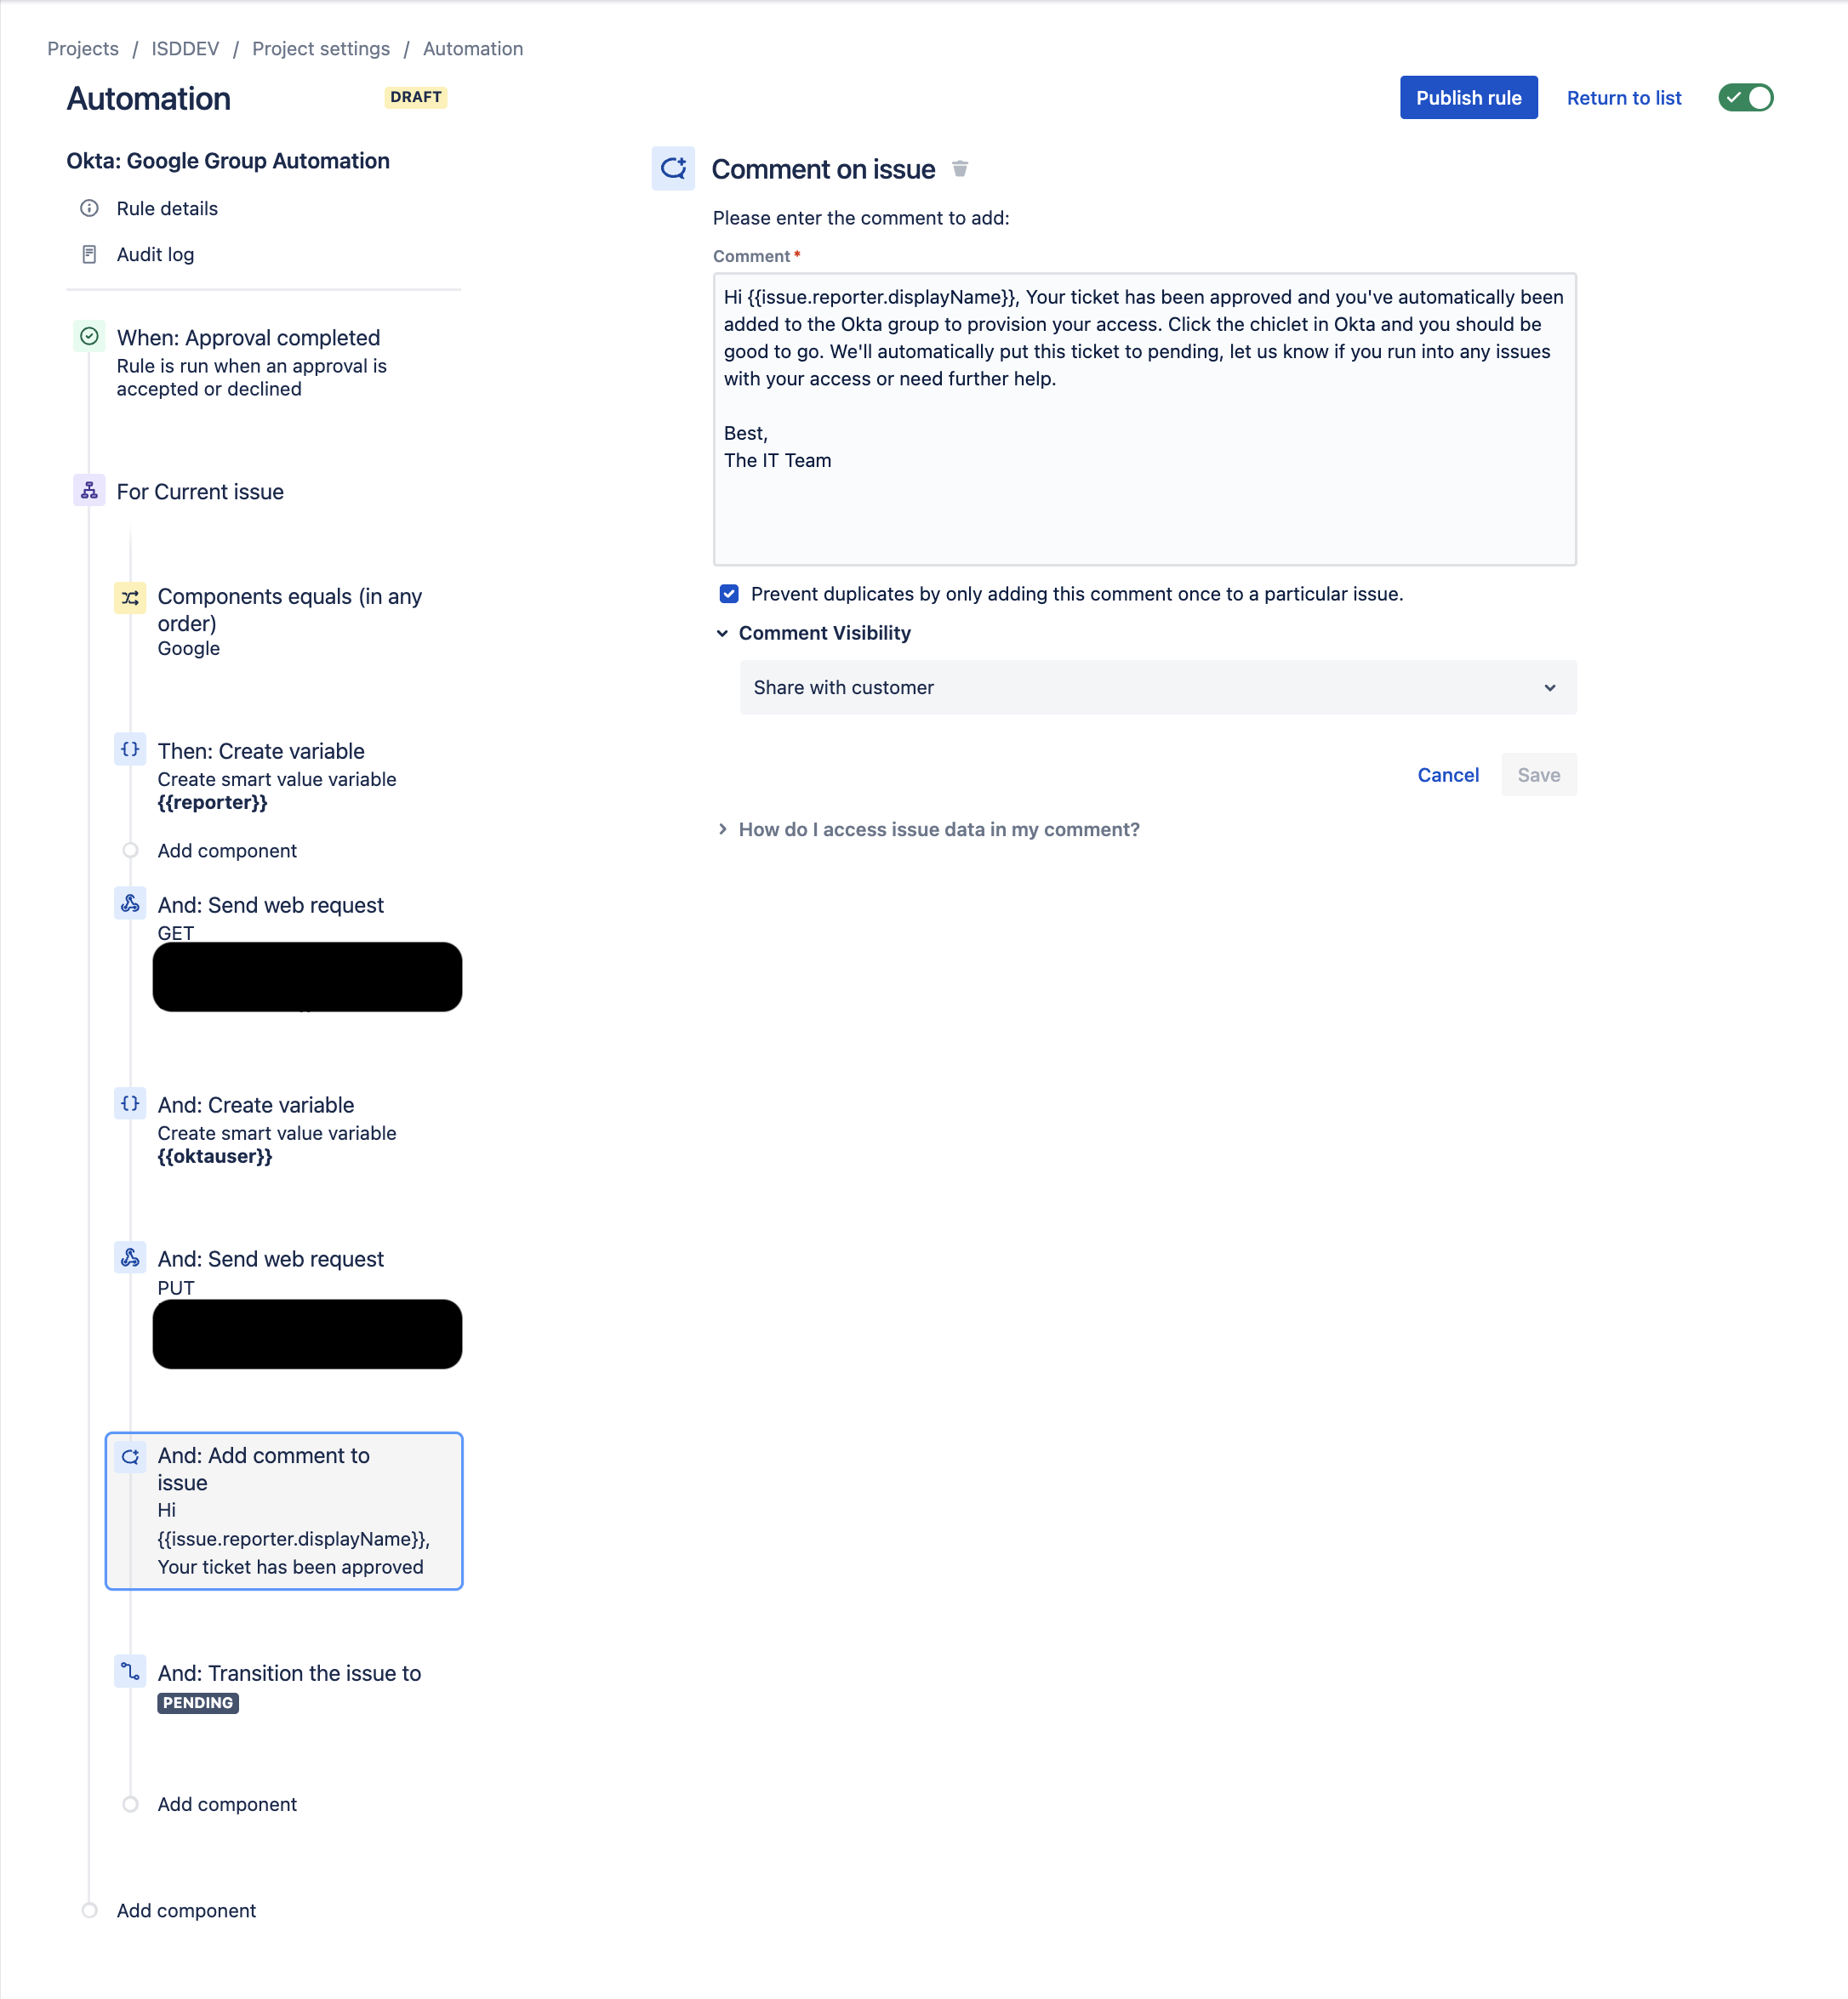
- Create an Add Comment Component:
- Your Comment can look something like this:
- "Hi {{issue.reporter.displayName}}, Your ticket has been approved and you've automatically been added to the Okta group to provision your access. Click the chiclet in Okta and you should be good to go. We'll automatically put this ticket to pending, let us know if you run into any issues with your access or need further help."
- Set Comment Visibility to "Share with Customer"
- Your Comment can look something like this:
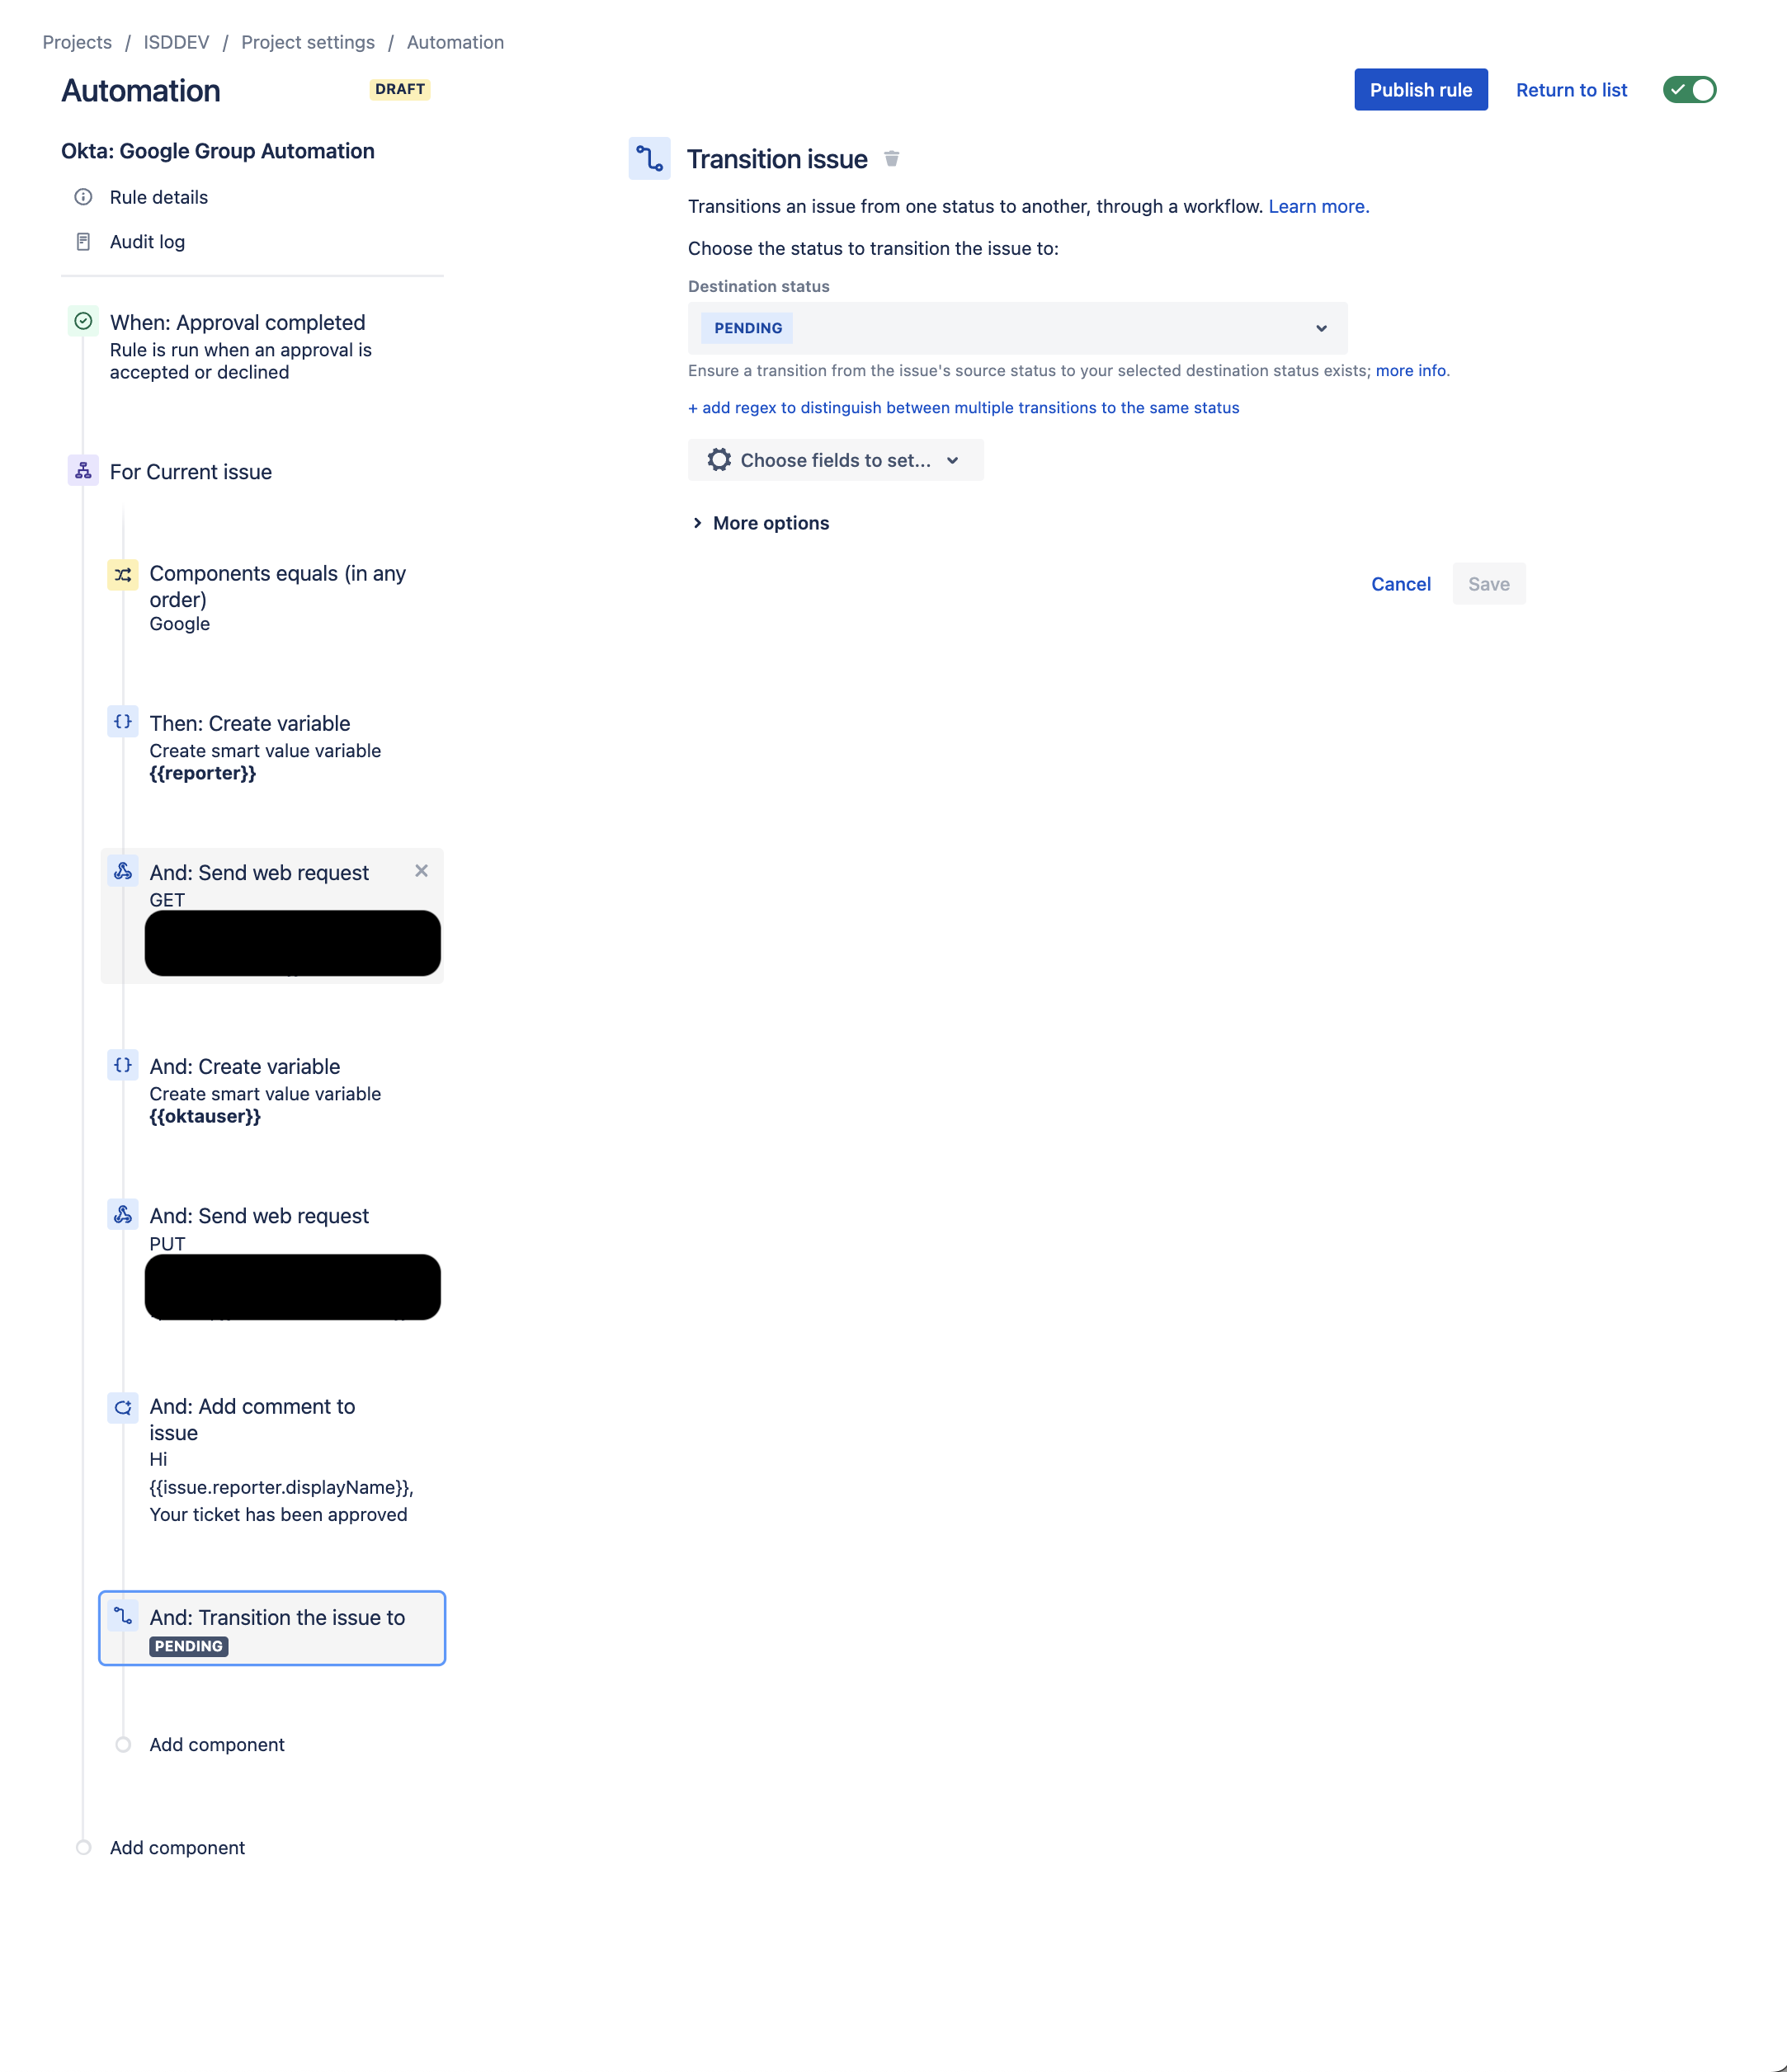
- Create a New Transition Status Component:
- Transition the status of the ticket to Pending. That way the reporter can get back to you if anything else breaks and if you've already set up the Pending Bump Automations from my previous blog post, the ticket will automatically close out in due time!


Step 5: Rinse and Repeat
The above automation is pretty basic. It’s a one-to-one automation between one component/automation in Jira and one Okta Group. But now that you have the basics of the Automation created in Jira Service Management, you can then duplicate the rule and swap out GroupIDs to create new automations for other applications.
There are upsides and downsides to everything and the above is no different. You can easily use the above method to rinse and repeat and create a whole mess of jira automations, one per application access request. This will need to map to 1 group obviously and can come with some limitations, such as, what if the user selects the wrong component in Jira and the manager approves it? How would this work with Temp Access requests, etc?
Creating a more robust solution that utilizes Jira’s new Forms feature enables you to get more granular and ensure approvals and mistakes aren’t missed. You can also utilize a programatic approach by polling the OKTA API for the correct group each time that you need to make a change. But the above simplistic Jira/Okta automation for adding a user to a group will work just fine for any bootstrapped IT Team looking to leverage automation to reduce the manual workload of the team.
It will save you a lot of hassle in the long run, and shift the burden of checking access approval and the details of someones request to their manager. Otherwise a good IT Team would have to do the manual verifications and checks themselves.
It also gives you quick peak into working with APIs in between systems. “Once you start down the dark path (APIs) forever will it control your destiny.” Master Yoda knew exactly what he was talking about but most of the time doing things the automated way through APIs is just fucking fun and will save you a boat load of time in the long run.
What’s Next?
Most of the access requests you and your team get will be for permanent access, but what happens when you have a request that comes through and is only for temporary access? Or what if a system utilizes SSO but not JIT/SCIM provisioning and a secondary task is required? We’ll dive into that in in my next blog update and continue to utilize APIs and automations to make it a reality.